Archives (page 6 of 19)

guide to the stars

Welcome to the Guide to the Stars, your comprehensive journey through the celestial wonders of the universe. This guide explores the fascination of stars, their history, science, and cultural significance, offering insights for both beginners and enthusiasts. Discover how stars have shaped human understanding and continue to inspire exploration and discovery.

1.1. Understanding the Basics of Star Gazing

Star gazing is a timeless activity that connects us to the universe. To begin, find a dark location with minimal light pollution for clearer views. Dress warmly and allow your eyes to adjust to the dark. Start with the naked eye to spot bright stars and constellations. Binoculars or a telescope can enhance your experience. Understanding basic astronomy terms and using star charts or apps will help identify celestial objects. Patience is key, as the night sky reveals its beauty gradually. Start with familiar constellations like the Big Dipper or Orion to build your skills.

1.2. Importance of Stars in Navigation and Culture

Stars have played a vital role in human history, serving as guides for navigation and inspiring cultural myths. Ancient sailors and travelers relied on constellations like the North Star to chart their courses. Culturally, stars have symbolized divine guidance, appearing in myths and legends across civilizations. They have also influenced art, literature, and spirituality, shaping human identity and our connection to the cosmos. Beyond practical uses, stars embody wonder, sparking curiosity and driving exploration. Their enduring significance reflects humanity’s deep bond with the celestial world and its mysteries.

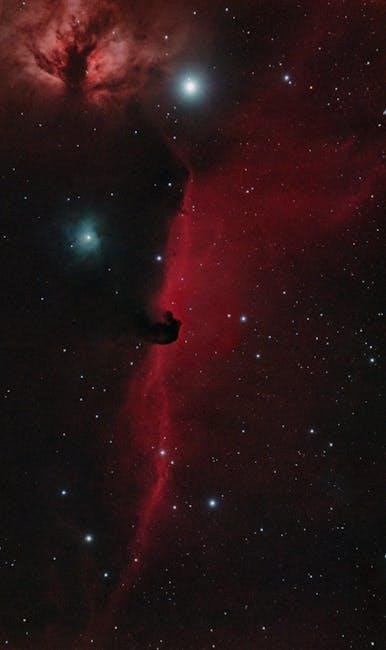
Understanding the Stars

Stars are luminous celestial bodies sustained by nuclear fusion, crucial for life and the universe’s structure.

2.1. What Are Stars and How Are They Formed?

Stars are massive, luminous celestial bodies primarily composed of hydrogen and helium. They are formed when gravity collapses molecular clouds, triggering nuclear fusion. This fusion powers stars, making them emit light and heat. The process begins with dust and gas condensing into a protostar, which eventually ignites fusion in its core. Stars vary in size, mass, and lifespan, shaping galaxies and the universe. Their formation is essential for creating elements and sustaining life, making them fundamental to cosmic evolution and human exploration.

2.2. The Life Cycle of Stars

Stars experience a life cycle that begins with formation in molecular clouds and ends in various terminal states. Massive stars burn brightly but die quickly, while smaller ones like the Sun live longer. After exhausting their fuel, stars shed their outer layers, forming nebulae, while their cores collapse into white dwarfs, neutron stars, or black holes. This cycle drives cosmic evolution, dispersing elements essential for planetary formation and life. Understanding stellar lifespans reveals the dynamic interplay of gravity, fusion, and time in shaping the universe.

2.3. Classification of Stars by Type and Brightness

Stars are classified by their spectral type and brightness, which reflect their temperature, size, and luminosity. The Harvard Spectral Classification system categorizes stars into types O, B, A, F, G, K, and M, ranging from hottest to coolest. Additionally, stars are grouped by luminosity classes, such as main sequence, giants, and white dwarfs. This dual classification system helps astronomers understand a star’s properties, including its color, temperature, and evolutionary stage. Such classifications are essential for studying stellar diversity and the universe’s structure, providing insights into the life cycles and roles of stars in cosmic evolution.

Constellations

Constellations are groups of stars forming patterns, often linked to myths and legends. They help navigate the night sky and inspire storytelling, connecting humanity to the universe’s beauty and mystery;

Constellations are ancient patterns of stars used to navigate and tell stories. With roots in early civilizations, they were crucial for agriculture and spirituality, shaping cultures and inspiring myths. Early stargazers named constellations after gods, animals, and heroes, creating a shared cosmic language. This tradition continues today, connecting us to our ancestors and their celestial observations, highlighting the enduring human quest to find meaning in the night sky.

3.2. The Zodiac Constellations and Their Significance

The Zodiac constellations are a fundamental part of astrology, comprising twelve signs that influence personality and destiny. Originating from ancient Babylonian and Greek cultures, these constellations were used for timekeeping and storytelling. Each sign, like Aries or Leo, symbolizes unique traits and is deeply rooted in mythology. Beyond astrology, the Zodiac has shaped agricultural cycles and calendars, leaving a lasting cultural impact that continues to inspire art and literature, making it a timeless aspect of human heritage.

3.3. How to Identify Major Constellations in the Night Sky

To identify major constellations, start by locating the North Star (Polaris) for northern skies or the Southern Cross for southern skies. Use bright stars as reference points and trace patterns like the Big Dipper or Orion’s Belt. Familiarize yourself with seasonal constellations, as their visibility changes throughout the year. Utilize star charts or apps to guide your observations. Practice makes perfect, so spend time gazing and connecting the dots to unlock the night sky’s hidden treasures and stories embedded in these ancient celestial patterns.

Star Myths and Legends

Star myths and legends are ancient stories that weave cultural and cosmological meanings into the night sky, reflecting humanity’s deep connection to the stars and their mysteries. Discover how these tales inspire wonder and curiosity across civilizations.

4.1. Ancient Mythologies Associated with Stars

Ancient cultures often linked stars to myths, creating stories that explained celestial phenomena and connected them to human experiences. Greek mythology, for example, tied constellations like Orion and Cassiopeia to legendary figures, while Norse myths associated the stars with gods like Odin. These narratives not only provided cultural identity but also served as early tools for navigation and agricultural planning. By weaving tales around the stars, ancient civilizations found meaning in the cosmos, blending science with spirituality. These myths endure, reflecting humanity’s timeless fascination with the night sky and its mysteries.

4.2. Cultural Significance of Constellations

Constellations have held profound cultural significance across civilizations, serving as symbols of identity, tradition, and storytelling. Many cultures mapped their myths, legends, and values onto star patterns, creating shared narratives that united communities. For instance, the zodiac in ancient Mesopotamia influenced calendars and spirituality, while Indigenous cultures like the Aboriginal Australians wove constellations into their Dreamtime stories. These star groupings often represented seasonal cycles, guiding agricultural practices and navigation. Beyond their practical uses, constellations became instruments of cultural preservation, embodying the beliefs and histories of peoples worldwide. Their enduring appeal reflects humanity’s deep connection to the cosmos and its mysteries.

4.3. Modern Interpretations of Star Myths

Modern interpretations of star myths blend ancient narratives with contemporary perspectives, offering fresh insights into their cultural and symbolic meanings. While traditional myths remain timeless, they are now explored through art, literature, and media, reimagining their relevance in today’s world. Additionally, psychological interpretations link constellations to human emotions and archetypes, while scientific advancements provide new contexts for understanding their origins. These modern views not only honor the legacy of star myths but also adapt them to resonate with current societal values and intellectual curiosities.

Astronomical Tools for Star Gazing

Telescopes, binoculars, star charts, and apps are essential tools for exploring the night sky, helping enthusiasts identify stars, planets, and constellations with precision and clarity.

5.1. Telescopes: A Guide to Choosing the Right One

Choosing the right telescope involves understanding your needs and budget. Refractor, reflector, and catadioptric telescopes cater to different preferences. Aperture size determines light-gathering ability, while mounts ensure stability. Accessories like eyepieces and tripods enhance functionality. Consider portability and ease of use. For beginners, a mid-range reflector or refractor is ideal. Advanced users may prefer larger aperture models. Research brands and read reviews to find the best fit for stargazing, planetary observation, or deep-space exploration. A well-chosen telescope unlocks the wonders of the cosmos, making every star-gazing session unforgettable.

5.2. Binoculars for Observing the Night Sky

Binoculars are an excellent tool for exploring the night sky, offering portability and ease of use. They are ideal for observing the Moon, planets, and bright star clusters. Look for models with image stabilization and a wide aperture for better light collection. While they lack the magnification of telescopes, binoculars provide a broader field of view, making them perfect for casual stargazing or travel. Many astronomers use binoculars for quick observations or as a complement to telescopes. They are also versatile for daytime nature watching, adding value to your stargazing kit. Popular models include 7×50 and 10×50 configurations, which strike a balance between magnification and stability. Proper care, such as regular cleaning and storage, ensures optimal performance over time.

5.3. Star Charts and Apps for Identifying Stars

Star charts and apps are essential tools for identifying stars and constellations. They provide detailed maps of the night sky, helping users locate celestial objects based on their location and time. Apps like Sky Map and Stellarium Mobile offer real-time views, using GPS and gyroscopes for accuracy. Many apps also include augmented reality features, overlaying information on the live sky. These tools are user-friendly, making stargazing accessible to everyone. They often include databases of stars, planets, and constellations, as well as alerts for celestial events like meteor showers or planetary alignments, ensuring you never miss a cosmic spectacle.

Celestial Events

Celestial events captivate astronomers and stargazers alike, offering glimpses of cosmic phenomena like eclipses, meteor showers, and planetary alignments. These occurrences highlight the universe’s dynamic beauty and wonder.

6.1. Eclipses: Solar and Lunar

Eclipses are rare and awe-inspiring celestial events where one celestial body blocks the light of another. A solar eclipse occurs when the Moon passes between the Earth and the Sun, casting a shadow on our planet. This can be partial, annular, or total, depending on the alignment. A lunar eclipse happens when the Earth blocks sunlight from reaching the Moon, often turning the Moon reddish. Both events are fleeting yet scientifically and culturally significant, offering unique opportunities to study the universe and inspire wonder in observers worldwide.

6.2. Meteor Showers and Their Peak Times

Meteor showers occur when Earth passes through trails of comet or asteroid debris, producing spectacular displays of shooting stars. Popular showers like the Perseid Meteor Shower in August and the Geminid Shower in December are known for their high rates of meteors. Peak times vary annually, but most showers are best viewed in dark, clear skies. Observers should allow their eyes to adjust to the dark and be patient for the brightest streaks. These events offer a thrilling way to connect with the celestial world and its natural fireworks.

6.3. Planetary Alignments and Conjunctions

Planetary alignments and conjunctions occur when planets appear close together in the sky, often creating stunning visual displays. These events happen when planets, as seen from Earth, align near the same solar system longitude. Conjunctions involve two planets, while alignments can include multiple. They occur sporadically due to varying orbital speeds and are rare for outer planets. Such events have cultural and astronomical significance, sometimes interpreted as meaningful omens. Observers can use star charts to predict and locate these alignments, making them a fascinating sight for stargazers and astronomers alike.

Star Navigation

Star navigation has historically guided travelers, using celestial patterns like the North Star. It remains a vital skill, blending tradition with modern tools for precise direction-finding.

7.1. Using the North Star for Navigation

The North Star, or Polaris, is a constant celestial guide for navigation. Found in the constellation Ursa Minor, it remains stationary in the night sky. To locate it, use the Big Dipper: follow the two stars at the end of the “bowl” to find Polaris. Its constancy makes it a reliable marker for determining north. This ancient technique has been vital for travelers, sailors, and explorers. Even with modern GPS, the North Star remains a timeless, failsafe method for orientation, ensuring direction in the vast and often unfamiliar night sky.

7.2. How to Navigate Using constellations

7.2. How to Navigate Using Constellations

Navigating with constellations involves recognizing patterns and their positions in the sky. Major constellations like Orion and Ursa Major serve as landmarks. By identifying their shapes and seasonal appearances, you can determine direction. For example, the Orion’s Belt points toward south in the Northern Hemisphere, while Crux guides toward south in the Southern Hemisphere. Learn to track these patterns and use them to estimate direction, creating a mental map of the sky. This ancient method requires practice but offers a reliable way to navigate without modern tools.

7.3. Modern GPS vs. Traditional Star Navigation

Modern GPS provides precise location data instantly, relying on satellite technology, while traditional star navigation uses celestial patterns. GPS offers accuracy and speed, ideal for urban and unfamiliar terrains, but depends on battery and signal. Star navigation, though slower, is timeless and battery-free, relying on constellations like the North Star. While GPS is more convenient, traditional methods remain vital as a backup and connect us to ancient explorers. Both systems have strengths, with GPS excelling in precision and star navigation offering reliability without technology.

The Science of Stars

Explore the fascinating science behind stars, including their formation, life cycles, and roles in cosmic evolution. Learn about stellar processes and phenomena shaping the universe.

8.1. Stellar Evolution and Death

Stellar evolution and death are pivotal processes in the universe. Stars are born from collapsing gas clouds, forming protostars that ignite nuclear fusion. They spend most of their lives on the main sequence, fusing hydrogen into helium. Low-mass stars like the Sun evolve into red giants, shedding their outer layers, and end as white dwarfs. High-mass stars undergo supernova explosions, leaving behind neutron stars or black holes. These processes shape the cosmic landscape, dispersing elements essential for planet formation and life, highlighting the cyclical nature of stellar existence and its role in the universe’s evolution.

8.2. Black Holes and Their Formation

Black holes are among the most enigmatic objects in the universe, formed when massive stars collapse under their own gravity. Their intense gravitational pull traps everything, including light, within their event horizon. The core of a massive star, typically over eight solar masses, collapses into a singularity after a supernova explosion. Black holes vary in size, from stellar-mass to supermassive ones residing in galactic centers. Their formation and behavior continue to captivate scientists, offering insights into extreme physics and the cosmos’s most mysterious phenomena.

8.3. The Role of Stars in the Universe’s Expansion

Stars play a pivotal role in the universe’s expansion through their mass and gravitational influence. Their formation and life cycles drive cosmic dynamics, shaping galaxies and spacetime. Stars’ massive cores create heavy elements, dispersed during supernovae, fostering new stellar and planetary systems. Binary star systems and mergers emit gravitational waves, influencing spacetime’s curvature. These processes contribute to the universe’s accelerating expansion, balanced by dark energy and gravity. Stars are integral to cosmic evolution, connecting astrophysics and cosmology in understanding the universe’s growth and structure.

Observing Stars

Exploring the night sky reveals countless celestial wonders. Proper preparation, tools, and timing enhance stargazing experiences, offering a deeper connection to the universe’s vast beauty and mysteries.

9.1. Best Times and Locations for Star Gazing

For optimal stargazing, choose dark locations with minimal light pollution. Summer and winter offer prime viewing for celestial events. Visit dark sky reserves or remote areas for clearer skies. Use apps to find ideal spots. Avoid full moons and cloudy nights. Early evening or pre-dawn hours often provide the best views. Plan around seasonal constellations and meteor showers for unforgettable experiences. Proper preparation and location selection can elevate your stargazing journey, revealing the night sky’s full splendor and wonder.

9.2. Tips for Observing Stars in Urban Areas

Stargazing in urban areas requires creativity to overcome light pollution. Find elevated spots like rooftops or hills to reduce glare. Use apps to locate darker pockets within the city. Allow your eyes to adjust to the dark for 20 minutes before observing. Binoculars or filters can enhance visibility. Focus on bright stars, planets, or constellations. Avoid streetlights and use red flashlights to preserve night vision. Patience is key, as even small glimpses of the stars can be rewarding. Urban stargazing may be challenging, but with the right techniques, it can still be enjoyable and educational.

9.3. How to Photograph the Night Sky

Photographing the night sky requires patience and the right techniques. Use a tripod for stability and a DSLR or mirrorless camera with manual settings. Shoot in RAW format for better image quality. Set manual focus, use a low ISO (800-1600), and wide aperture (f/2.8-f/4). Long exposures (20-30 seconds) capture starlight effectively. Include foreground elements like landscapes to add depth. Use the “live view” to focus on bright stars. Edit photos using software like Adobe Lightroom to enhance colors and contrast. Practice and experiment to capture stunning celestial imagery.

Star Facts and Trivia

Discover fascinating facts about stars, including their unique phenomena and intriguing histories. Learn about famous stars, record-breaking luminosity, and strange celestial occurrences that captivate astronomers and enthusiasts alike.

10.1. Interesting Facts About Famous Stars

Explore intriguing facts about renowned stars like Sirius, the brightest star in the night sky, and Betelgeuse, known for its reddish hue and potential supernova. Learn about Rigel, one of the most luminous stars, and Vega, a star with a unique rotation. Discover how Aldebaran and Antares are associated with ancient myths. These stars captivate astronomers and enthusiasts alike with their unique characteristics and historical significance, offering insights into the universe’s vastness and beauty.

10.2. Record-Breaking Stars in the Universe

Discover the universe’s most extraordinary stars, from the largest to the brightest. VY Canis Majoris is the largest known star, with a radius over 2,100 times that of the Sun. R136a1 shines as the brightest, outpacing others in luminosity. OY Ursae Majoris is the hottest, with surface temperatures exceeding 100,000°C. HD 140283 is the oldest, estimated at 13.8 billion years. VFTS 102 spins fastest, rotating at 600 km/s. These celestial giants push the limits of stellar physics, captivating astronomers and stargazers alike with their extreme characteristics and unparalleled magnificence.

10.3. Strange and Unique Star Phenomena

Explore the universe’s most bizarre star phenomena, from fast-spinning stars like VFTS 102, which rotates at 600 km/s, to pulsars emitting intense radiation beams. Discover binary stars that share material, creating unique systems. Learn about star cannibalism, where one star devours another, and microwave stars emitting unusual radiation. These phenomena reveal the cosmos’s extremes, showcasing the diversity and complexity of stellar behavior. Each strange occurrence expands our understanding of the universe’s infinite mysteries and the extraordinary lives of stars.

The Future of Star Exploration

Discover upcoming missions, technological advancements, and humanity’s potential to settle near distant stars, unlocking the universe’s secrets and expanding our cosmic presence.

11.1. Space Missions to Study Stars

Future space missions aim to deepen our understanding of stars through advanced telescopes and probes. The James Webb Space Telescope already explores star formation in infrared, while the European Space Agency’s Gaia mission maps the Milky Way’s stars with unprecedented precision. Upcoming missions, like the ARIEL (Atmospheric Remote-sensing Infrared Exoplanet Large-survey) mission, will study exoplanet atmospheres, revealing insights into star-planet interactions. These endeavors promise groundbreaking discoveries, advancing our knowledge of stellar evolution and the universe’s expansion, while paving the way for future human exploration and potential settlements near distant stars.

11.2. The Role of Technology in Star Research

Technology plays a pivotal role in advancing star research, enabling scientists to study stars with unprecedented precision. Space telescopes like Hubble and JWST capture high-resolution images and spectra, revealing stellar composition and activity. Spectroscopy aids in analyzing starlight to determine properties like temperature and motion. Interferometry combines signals from multiple telescopes to achieve sharper observations. Additionally, AI and machine learning algorithms process vast datasets to identify patterns and predict celestial events. These tools collectively enhance our understanding of stars and drive future discoveries, making them indispensable in modern astrophysics.

11.3. Potential for Human Settlement Near Distant Stars

Human settlement near distant stars represents a promising yet challenging frontier in space exploration. With advancements in propulsion systems and life support technologies, missions to habitable exoplanets, like those in the Proxima Centauri system, are becoming more feasible. However, significant hurdles such as interstellar travel time, radiation exposure, and resource sustainability must be addressed. Robotic precursors and in-situ resource utilization could pave the way for future colonies. International collaboration and innovation will be critical in turning this vision into reality, ensuring humanity’s presence among the stars for generations to come.

The endless fascination with stars continues to captivate humanity, inspiring exploration and wonder. This guide has provided a foundation for understanding and appreciating celestial beauty, encouraging further discovery.

12.1. The Endless Fascination with Stars

The allure of stars has captivated humanity for centuries, sparking curiosity and inspiring exploration. Their beauty and mystery drive us to uncover their secrets, from ancient myths to modern discoveries. Stars symbolize hope and wonder, reminding us of the universe’s vastness and our place within it. This fascination fuels scientific advancements and personal journeys, ensuring stars remain a timeless source of inspiration for generations to come.

12.2. Encouragement to Explore the Night Sky

Exploring the night sky offers a profound connection to the universe, fostering curiosity and appreciation for celestial wonders. Whether using binoculars, telescopes, or simply the naked eye, stargazing is accessible to everyone. Each starry night invites us to discover new constellations, witness astronomical events, and reflect on our place in the cosmos. Embrace the adventure, for the night sky holds endless stories waiting to be uncovered, inspiring awe and wonder in all who venture to look up.

12.3. Final Thoughts on the Guide to the Stars

This guide has traversed the vast expanse of stars, from their formation to cultural myths and modern exploration. It has equipped you with tools, knowledge, and inspiration to delve deeper into the night sky. Remember, the stars are not just distant lights but gateways to understanding the universe and ourselves. Continue exploring, learning, and marveling at their beauty. The cosmos holds endless secrets, and your curiosity is the key to unlocking them. Keep looking up, for the stars will forever captivate and inspire humanity.

ganapati atharvashirsha pdf english

Ganapati Atharvashirsha is a powerful hymn dedicated to Lord Ganesha, offering spiritual guidance and worship practices. Its origins trace back to ancient Sanskrit texts, emphasizing devotion and wisdom. Available in English PDF translations, it provides accessible insights for seekers, promoting calm and clarity in life.

Overview of Ganapati Atharvashirsha

Ganapati Atharvashirsha is a sacred Hindu hymn dedicated to Lord Ganesha, comprising 141 verses that extol his divine attributes and significance. Rooted in the Atharva Veda, it blends philosophical insights with devotional worship, offering a profound understanding of Ganesha’s role as the remover of obstacles. The text emphasizes spiritual growth, intellectual clarity, and emotional stability, making it a cherished recitation for devotees. Its verses highlight Ganesha’s cosmic relevance and his manifestation as the ultimate reality. Available in English PDF translations, it serves as a accessible resource for global seekers, preserving its ancient wisdom while catering to modern spiritual practices.

Importance of the Ganapati Atharvashirsha in Hindu Scriptures

The Ganapati Atharvashirsha holds a revered position in Hindu scriptures, particularly within the Atharva Veda tradition. It is celebrated for its profound spiritual and philosophical depth, offering insights into the nature of Ganesha as the supreme deity. This text is often regarded as a potent tool for spiritual elevation, providing devotees with a means to connect with the divine essence of Ganesha. Its verses are not only devotional but also carry practical wisdom, guiding individuals towards a balanced and obstacle-free life. The availability of its English PDF translations has further enhanced its reach, making its timeless teachings accessible to a global audience seeking spiritual enrichment.

Origin and Background

Ganapati Atharvashirsha is rooted in ancient Hindu scriptures, with its verses drawn from diverse sources. It is deeply connected to the Atharva Veda, emphasizing Ganesha’s divine significance and cosmic role.

Historical Context of Ganapati Atharvashirsha

Ganapati Atharvashirsha is deeply rooted in Hindu scriptures, with its origins tracing back to the Atharva Veda. This sacred text is a compilation of verses that highlight Ganesha’s divine role and cosmic significance. It is not a standalone Vedic text but rather a collection of mantras and hymns from various sources, reflecting the evolving devotion to Ganesha over centuries. The text emphasizes Ganesha as the remover of obstacles and the embodiment of wisdom. Its historical context is intertwined with the broader Hindu tradition, where it has been revered for its spiritual depth and transformative power. The name “Atharvashirsha” itself signifies “one with a cool head,” symbolizing calmness and clarity.

Connection to the Atharva Veda

Ganapati Atharvashirsha is deeply connected to the Atharva Veda, one of the most ancient Hindu scriptures. The term “Atharva” refers to the Vedic tradition, while “shirsha” means head or essence. This text draws its spiritual authority from the Atharva Veda, which emphasizes rituals, mantras, and cosmic principles. Although Ganapati Atharvashirsha is not directly part of the Atharva Veda, it incorporates Vedic elements and principles, making it a revered text in Hinduism. Its connection to the Atharva Veda underscores its significance as a source of divine wisdom and spiritual guidance, particularly in the worship of Lord Ganesha. This link enhances its credibility and sacred status among devotees seeking enlightenment and blessings.

Evolution of the Text Over Time

Ganapati Atharvashirsha has evolved significantly over centuries, transitioning from an ancient Sanskrit hymn to widely accessible English translations. Originally rooted in Vedic traditions, it was passed down orally before being documented. Scholars and spiritual leaders have contributed to its interpretation, ensuring its relevance in modern times. The text’s adaptability has allowed it to resonate with diverse audiences, maintaining its spiritual essence while reaching global devotees through English versions and digital formats like PDFs. This evolution reflects its enduring significance as a source of wisdom and worship, bridging ancient traditions with contemporary practices to inspire seekers worldwide.

Significance and Meaning

Ganapati Atharvashirsha is a powerful hymn invoking Lord Ganesha, offering spiritual growth, wisdom, and practical life benefits. Its timeless teachings provide calm, stability, and inspiration, now accessible in English translations.

Spiritual Significance of Ganapati Atharvashirsha

Ganapati Atharvashirsha holds profound spiritual significance as a powerful hymn dedicated to Lord Ganesha, offering divine wisdom and guidance. It emphasizes the importance of devotion, patience, and self-control. The text, derived from ancient Sanskrit traditions, is structured into 28 verses, each conveying deep spiritual truths. By reciting it, one seeks to cultivate a calm and composed mind, symbolized by the name “Atharvashirsha,” meaning “one with a cool head.” The hymn also highlights the removal of obstacles and the attainment of spiritual growth, making it a revered text for those seeking inner peace and enlightenment.

Symbolism and Deeper Meanings

Ganapati Atharvashirsha is rich in symbolism, with its name signifying “one with a cool head,” reflecting calmness and clarity. The hymn’s 28 verses symbolize wisdom, patience, and self-control. Ganesha, as the remover of obstacles, embodies the power to overcome challenges, both material and spiritual. The text’s deeper meanings emphasize the unity of existence and the divine within. It also highlights the importance of devotion, knowledge, and the balance of opposites, such as heat and coolness, symbolized by “Atharva.” The hymn’s recitation is believed to purify the mind and awaken spiritual consciousness, making it a profound tool for inner transformation and enlightenment.

Role of Ganapati in the Text

Ganapati, as the remover of obstacles, holds a central role in the text, symbolizing wisdom, prosperity, and new beginnings. The Atharvashirsha portrays him as the embodiment of divine wisdom, guiding devotees to overcome spiritual and material challenges. His attributes, such as the elephant head and large ears, signify strength, patience, and the ability to listen and understand. The text emphasizes his role in purifying the mind and awakening consciousness, making him a revered figure in Hindu spirituality. By invoking Ganapati, one seeks clarity, resilience, and the strength to navigate life’s complexities, ultimately leading to spiritual growth and enlightenment.

Structure and Content

The Ganapati Atharvashirsha is a structured compilation of sacred verses and mantras, detailing rituals, meditation practices, and the significance of each section for spiritual growth.

Structure of the Ganapati Atharvashirsha

The Ganapati Atharvashirsha is a meticulously structured text, comprising sacred verses and mantras dedicated to Lord Ganesha. It begins with an invocation, followed by core teachings that emphasize spiritual growth and divine connection. The text is divided into clear sections, each focusing on specific aspects of worship, meditation, and the attainment of wisdom. Its precise structure ensures a logical flow, guiding devotees through rituals and introspection. Available in English PDF translations, the text remains accessible while preserving its ancient essence and spiritual significance.

Key Verses and Their Interpretations

The Ganapati Atharvashirsha contains profound verses, each carrying deep spiritual significance. One such verse is “Om Namaste Ganapataye.” This mantra is a humble salutation to Ganesha, seeking his blessings for guidance and wisdom. Another critical verse emphasizes the importance of a “cool head,” symbolizing mental clarity and emotional stability. These verses are meticulously interpreted in English PDF translations, offering insights into their application in daily life. They highlight themes of devotion, self-control, and the pursuit of knowledge, making the text a valuable resource for spiritual seekers.

Mantras and Their Spiritual Impact

The mantras in Ganapati Atharvashirsha are deeply transformative, resonating with divine energy. Reciting them fosters calmness, stability, and clarity of thought. The mantra “Om Ganeshaya Vidmahe” invokes Ganesha’s presence, while “Vakratundaya Dhimahi” symbolizes his power to remove obstacles. These chants align the seeker’s vibrations with universal harmony, enhancing spiritual growth. The English PDF versions provide clear interpretations, enabling devotees to understand and recite the mantras effectively. Regular practice is believed to awaken consciousness, promote emotional balance, and grant wisdom, making the text a powerful tool for spiritual evolution and self-realization.

Benefits of Reciting Ganapati Atharvashirsha

Reciting Ganapati Atharvashirsha brings immense spiritual and practical benefits. It fosters calmness, stability, and clarity of thought. Regular recitation helps overcome obstacles, enhances mental focus, and promotes emotional well-being.

Spiritual Benefits of the Recitation

Reciting Ganapati Atharvashirsha offers profound spiritual benefits, including a deep connection to Lord Ganesha and a calming effect on the mind. It fosters inner peace, purifies the soul, and strengthens spiritual awareness. The hymn aids in self-realization, helping seekers understand divine consciousness. Regular recitation aligns one’s energy with the universe, promoting harmony and balance. It also enhances meditation practices, allowing devotees to transcend worldly distractions. The text’s sacred vibrations cleanse negative energies, fostering a serene and focused mindset. By embodying the teachings, one embodies the essence of “Atharvashirsha,” symbolizing a calm and controlled mind, essential for spiritual growth and enlightenment.

Practical Benefits in Daily Life

Reciting Ganapati Atharvashirsha brings numerous practical benefits, enhancing daily life with its transformative energy. It fosters emotional stability, helping individuals remain calm and composed in challenging situations. The hymn is known to improve focus and memory, aiding in personal and professional tasks. By invoking Ganesha’s blessings, it helps overcome obstacles and fosters a positive mindset. Regular recitation also promotes better decision-making and problem-solving skills. Additionally, it cultivates a sense of gratitude and contentment, leading to more harmonious relationships. The practice is believed to attract abundance and prosperity, making it a powerful tool for achieving balance and success in everyday life while maintaining spiritual harmony.

Emotional and Mental Stability

Reciting Ganapati Atharvashirsha fosters emotional and mental stability by calming the mind and reducing stress. The hymn’s soothing vibrations help alleviate anxiety and promote inner peace. It encourages resilience, enabling individuals to face life’s challenges with clarity. By invoking Ganesha’s grace, it helps balance emotions, fostering patience and self-control. Regular recitation enhances mental focus and reduces emotional turmoil, leading to a more serene and composed state of being. This practice also cultivates self-awareness, allowing individuals to navigate life’s complexities with greater ease and emotional resilience. Its profound impact makes it a valuable tool for maintaining mental harmony in today’s fast-paced world.

Recitation Guidelines

Proper recitation involves correct pronunciation, posture, and mental focus. Use an achamana patra for rituals. Regular practice enhances spiritual benefits. Available in English PDF for easy access.

Proper Way to Recite Ganapati Atharvashirsha

Ganapati Atharvashirsha is a sacred hymn that requires mindful recitation. Begin by purifying your hands with water using an achamana patra. Sit comfortably, facing east, and maintain a calm mind. Recite with correct pronunciation, paying attention to the rolling of the tongue, as in “Bhadram Karnebhih.” Focus on the meaning and spiritual intent. Avoid distractions and recite with dedication. Regular practice enhances its benefits, fostering emotional stability and clarity. Follow guidelines from the English PDF translations for accurate rituals and chants.

Importance of Pronunciation and Intonation

Correct pronunciation and intonation are vital for the effective recitation of Ganapati Atharvashirsha. The hymn’s power lies in its sacred sounds, which, when uttered properly, resonate deeply within the reciter. Mispronunciation can diminish its spiritual impact, while accurate intonation ensures the mantra’s energy is harnessed fully. The rolling of the tongue, as in the first verse “Bhadram Karnebhih,” is crucial. English PDF versions often include phonetic guides to aid non-native speakers. Proper intonation aligns the reciter’s energy with the divine, enhancing meditation and worship. Practice under a qualified guru is recommended for mastery, ensuring the recitation’s authenticity and potency.

Recommended Practices for Effective Recitation

For effective recitation of Ganapati Atharvashirsha, create a serene environment, free from distractions; Begin with a calm mind and purified intentions. Use an achamana patra for sipping water, symbolizing purity. Recite the hymn with devotion, focusing on its spiritual essence. Regular practice, ideally during early mornings or evenings, enhances its benefits. Incorporate meditation before recitation to align with the divine energy. English PDF versions provide clear guidance, aiding those unfamiliar with Sanskrit. Consistency in practice and sincerity of heart are key to experiencing the profound effects of this sacred text, fostering inner peace and spiritual growth.

Availability in English

The Ganapati Atharvashirsha is widely available in English PDF translations, making it accessible for global devotees. These translations preserve the essence of the original Sanskrit text, ensuring spiritual authenticity and ease of understanding for those unfamiliar with Sanskrit. Many websites and platforms offer free downloads, catering to the growing interest in Vedic scriptures. This availability has significantly contributed to its popularity in modern times, allowing seekers worldwide to embrace its teachings and incorporate its recitation into their spiritual practices.

Ganapati Atharvashirsha in English Translation

The Ganapati Atharvashirsha is now widely available in English translation, making its profound teachings accessible to a global audience. These translations faithfully capture the spiritual essence of the original Sanskrit text, ensuring that devotees can resonate with its deep meanings. The English versions often include annotations and explanations, helping readers understand complex Vedic concepts. This accessibility has made the hymn a popular choice for spiritual seekers worldwide, allowing them to embrace its wisdom and incorporate its practices into their daily lives.

PDF Versions and Their Accessibility

Ganapati Atharvashirsha is widely available in PDF format, making it easily accessible for devotees worldwide. These PDF versions often include the original Sanskrit text alongside its English translation, ensuring a seamless understanding for non-Sanskrit speakers. Many websites offer free downloads, and the files are compatible with various devices, allowing users to carry the sacred text conveniently. This accessibility has made the scripture more approachable, enabling individuals to recite and study it daily. The PDFs are also often accompanied by guides for proper recitation, enhancing the spiritual experience of those who seek enlightenment through this revered hymn.

Cultural and Religious Impact

Ganapati Atharvashirsha holds profound cultural and religious significance, featured prominently in Hindu festivals like Ganesha Chaturthi. Its recitation provides emotional stability and spiritual growth, deeply influencing devotees’ lives.

Role in Hindu Festivals and Rituals

Ganapati Atharvashirsha plays a central role in Hindu festivals, particularly during Ganesha Chaturthi, where it is recited to invoke Lord Ganesha’s blessings. Its verses are integral to puja rituals, offering devotees emotional stability and spiritual growth. The text is often chanted during ceremonies to seek prosperity and wisdom, making it a vital component of cultural and religious practices.

Popularity in Modern Times

Ganapati Atharvashirsha has gained significant popularity in modern times due to its universal appeal and accessibility through English PDF translations. Many seekers find its teachings relevant to contemporary life, offering emotional stability and practical wisdom. The text’s emphasis on calmness and clarity resonates with individuals seeking balance in today’s fast-paced world. Its availability in digital formats has further increased its reach, making it a cherished resource for spiritual growth and daily inspiration.

Ganapati Atharvashirsha remains a timeless spiritual guide, offering wisdom and peace. Its English PDF versions have made it accessible globally, ensuring its teachings endure for modern seekers.

Final Thoughts on Ganapati Atharvashirsha

Ganapati Atharvashirsha is a profound sacred text that embodies the essence of devotion to Lord Ganesha. Its teachings emphasize the importance of spiritual growth and mental clarity. The availability of English PDF versions has made this ancient wisdom accessible to a global audience, allowing modern seekers to benefit from its timeless insights. By reciting and understanding the hymn, individuals can achieve emotional stability and a deeper connection to the divine. It serves as a reminder of the power of faith and the enduring relevance of Vedic traditions in contemporary life. Its influence continues to inspire and guide those on their spiritual journeys.

tire minder manual

The Tire Minder Manual is a comprehensive guide for users to monitor tire pressure and temperature effectively. It ensures safety, optimal vehicle performance, and provides troubleshooting solutions for seamless functionality and maintenance.

1.1 What is a Tire Minder Manual?

The Tire Minder Manual is a detailed guide designed to help users understand and operate tire pressure monitoring systems (TPMS) effectively. It provides essential information on system installation, operation, and maintenance. The manual serves as a reference for troubleshooting common issues and ensures optimal use of the Tire Minder system. By following the instructions, users can monitor tire pressure and temperature in real-time, enhancing vehicle safety and performance. The manual is available in digital formats, such as PDF, for easy access and includes step-by-step instructions for adjusting settings and responding to alerts. It is a vital resource for anyone seeking to maximize the benefits of their tire monitoring system while minimizing potential risks associated with improper use.

1.2 Importance of the Tire Minder Manual

The Tire Minder Manual is essential for ensuring the safe and efficient operation of the tire pressure monitoring system. It provides critical information for installing, maintaining, and troubleshooting the system, helping users avoid potential risks associated with incorrect usage. By following the manual, drivers can maintain optimal tire pressure, improving vehicle performance, fuel efficiency, and safety. The manual also outlines emergency procedures, such as responding to high-temperature alerts or low tire pressure warnings, which are vital for preventing accidents. Additionally, it serves as a reference for understanding error codes and resetting the system when necessary. Regular use of the manual ensures compliance with safety guidelines and prolongs the lifespan of both the tires and the monitoring system. Its availability in digital formats makes it easily accessible for users to refer to whenever needed.

1.3 How to Use the Manual Effectively

To use the Tire Minder Manual effectively, start by thoroughly reading the introduction and understanding the system’s components. Familiarize yourself with the table of contents to quickly locate specific sections, such as installation, operation, and troubleshooting. Always follow the step-by-step instructions for tasks like setting tire pressure baselines or adjusting settings. Refer to the diagrams and illustrations provided to better understand complex procedures. Pay special attention to safety precautions and emergency procedures to ensure safe operation. Regularly review the manual to stay updated on system features and best practices. For digital versions, use the search function to find specific topics quickly. By consistently referencing the manual, you can maximize the system’s functionality, ensure accurate monitoring, and maintain optimal tire conditions. This approach guarantees a safe and efficient user experience.

Key Features of the Tire Minder System

The Tire Minder System offers real-time tire pressure and temperature monitoring, compatibility with multiple vehicles, customizable pressure baselines, and instant alerts for safety and efficiency on the road.

2.1 Overview of the Tire Minder System

The Tire Minder System is a comprehensive tire pressure and temperature monitoring solution designed to enhance vehicle safety and performance. It consists of a monitor, sensors, and a signal booster, providing real-time data to ensure optimal tire conditions. Compatible with various vehicles, including RVs, trailers, and cars, the system offers customizable pressure baselines and instant alerts for under-inflation, over-inflation, or high temperatures. The modular design allows users to add or remove sensors as needed, making it adaptable to different vehicle configurations. With its user-friendly interface and robust functionality, the Tire Minder System is a reliable tool for maintaining tire health, reducing wear, and improving fuel efficiency. It also supports multiple tire positions, ensuring comprehensive monitoring for both safety and efficiency on the road.

2.2 Benefits of Using the Tire Minder

Using the Tire Minder System offers numerous benefits, including enhanced safety, improved fuel efficiency, and extended tire life. By providing real-time monitoring of tire pressure and temperature, it helps prevent accidents caused by under-inflated tires. The system alerts users to potential issues before they become critical, reducing the risk of tire failure and promoting safer driving conditions. Additionally, maintaining optimal tire pressure improves vehicle performance, reduces wear and tear, and lowers fuel consumption. The customizable alerts and easy-to-use interface make it convenient for drivers to stay informed without constant monitoring. Its compatibility with various vehicles ensures versatility, while the ability to adjust baselines and respond to warnings adds to its practicality. Overall, the Tire Minder System is a valuable tool for any driver seeking to enhance safety, efficiency, and peace of mind on the road.

2.3 Compatibility with Different Vehicles

The Tire Minder System is designed to be compatible with a wide range of vehicles, including cars, trucks, RVs, and trailers. Its universal design allows it to integrate seamlessly with various tire configurations, ensuring accurate monitoring for different axle setups. Whether you own a passenger vehicle or a heavy-duty trailer, the system adapts to meet your specific needs. The Tire Minder supports multiple tire positions, making it suitable for vehicles with up to 6 or more tires. Its flexibility ensures that drivers can monitor tire pressure and temperature in real-time, regardless of the vehicle type. Additionally, the system’s adjustable settings enable customization based on the vehicle’s requirements, providing a tailored solution for enhanced safety and performance. This versatility makes the Tire Minder an ideal choice for drivers seeking a reliable and adaptable tire monitoring solution.

Safety Precautions

Always follow safety precautions when using the Tire Minder System. Handle the device with care to avoid damage; Avoid exposing it to high temperatures or using it for unintended purposes. Ensure the manual is accessible for reference during operation.

3.1 General Safety Guidelines

Always adhere to the following general safety guidelines when using the Tire Minder System. Ensure the device is installed and operated as specified in the manual. Avoid exposing the system to water or extreme temperatures, as this may damage its components. Never use the system for purposes other than monitoring tire pressure and temperature. Keep the manual readily available for reference. Regularly inspect the system for any signs of wear or damage. If you notice any malfunctions, discontinue use until repairs are made. Always follow proper charging procedures and avoid overcharging the device. Ensure the monitor is in “M Mode” during travel to maintain continuous tire monitoring. Failure to comply with these guidelines may result in inaccurate readings or system failure. Always pull over and check tires immediately if an alert is triggered.

3.2 Handling the Tire Minder System

Proper handling of the Tire Minder System ensures its longevity and accuracy. Avoid exposing the sensors or monitor to water or harsh chemicals, as this may damage the electronics. When handling the system, avoid dropping or applying excessive force, which could impair functionality. For models like the TM66 or A1A, ensure sensors are securely attached to the valve stems to maintain proper operation. Never pull the cable by the wire; always handle it by the connector. When adjusting settings, refer to the PDF manual for guidance. Store the system in a dry, cool place when not in use. Regularly clean the sensors to prevent dust or debris buildup. For models like the TM55, ensure the solar panel is free from obstructions. Always use genuine Tire Minder accessories to prevent compatibility issues. Proper handling ensures accurate tire pressure and temperature monitoring, enhancing safety and system performance.

3.3 Emergency Procedures

Proper handling of the Tire Minder System ensures its longevity and accuracy. Avoid exposing the sensors or monitor to water or harsh chemicals, as this may damage the electronics. When handling the system, avoid dropping or applying excessive force, which could impair functionality. For models like the TM66 or A1A, ensure sensors are securely attached to the valve stems to maintain proper operation. Never pull the cable by the wire; always handle it by the connector. When adjusting settings, refer to the PDF manual for guidance. Store the system in a dry, cool place when not in use. Regularly clean the sensors to prevent dust or debris buildup. For models like the TM55, ensure the solar panel is free from obstructions. Always use genuine Tire Minder accessories to prevent compatibility issues. Proper handling ensures accurate tire pressure and temperature monitoring, enhancing safety and system performance.

Installation Guide

Install the Tire Minder System by plugging in the Bluetooth adapter, mounting the monitor, and synchronizing sensors with the vehicle’s tires. Refer to the PDF manual for detailed steps.

4.1 System Components

The Tire Minder System includes essential components for accurate tire pressure and temperature monitoring. These include the monitor, Bluetooth adapter, tire sensors, signal booster, and power chargers. The monitor displays real-time data, while sensors attach to valve stems to transmit readings. The Bluetooth adapter ensures wireless connectivity, and the signal booster enhances transmission strength for larger vehicles. Additional accessories like USB chargers and mounting hardware are provided for convenient installation. The system is designed to be user-friendly, with components working together seamlessly to ensure optimal performance. Refer to the PDF manual for a detailed inventory of included parts and optional accessories to customize your setup. Proper installation of these components is crucial for reliable operation and safety on the road.

4.2 Step-by-Step Installation Process

Begin by charging the monitor and sensors using the provided USB charger. Once charged, install the sensors on the tire valve stems, ensuring they are securely tightened. For larger vehicles, attach the signal booster to enhance connectivity. Next, power on the monitor and pair it with the sensors via the TPMS app. Follow the app’s prompts to sync each sensor to its corresponding tire position. Finally, mount the monitor in a visible location using the included adhesive or suction cup. Ensure all components are functioning correctly before driving. Refer to the PDF manual for detailed instructions and troubleshooting tips. Proper installation ensures accurate tire pressure and temperature monitoring, enhancing safety and performance. Always verify tire inflation matches the baseline pressure before completing the setup.

4.3 Post-Installation Checks

After installation, perform a series of checks to ensure the system functions correctly. First, verify that all sensors are connected and transmitting data to the monitor. Check that the tire pressure readings match the baseline values set during installation. Test the signal strength by moving around the vehicle to ensure consistent connectivity. Ensure the monitor displays all tire positions accurately and that alerts trigger for low pressure or high temperature. Finally, confirm that the system’s audible and visual alarms are functioning properly. Additional checks include verifying the monitor’s power supply and ensuring all components are securely mounted. Refer to the Tire Minder Manual for detailed procedures to validate the installation. Proper post-installation checks ensure reliable tire monitoring and optimal performance for enhanced safety on the road.

Operating Instructions

Power on the device, navigate the user interface, and set tire pressure baselines for accurate monitoring. Understand alerts for low pressure or high temperature to ensure optimal tire performance and safety always.

5.1 Turning On the Device

To turn on the Tire Minder device, ensure it is fully charged using the provided USB charger. Connect the device to a power source until the LED indicator shows a solid light, confirming it is powered on. Once charged, press and hold the power button for 3 seconds until the screen lights up. The device will automatically enter monitoring mode, displaying tire positions and current pressure readings. If the device does not turn on, check the power source or repeat the charging process. Refer to the manual for troubleshooting if issues persist. Proper activation ensures accurate real-time monitoring of tire pressure and temperature, enhancing safety and performance while driving or stationary. Always follow the manufacturer’s guidelines for optimal functionality.

5.2 Navigating the User Interface

Navigating the Tire Minder user interface is straightforward and intuitive. Upon turning on the device, the home screen displays tire positions and current pressure readings. Use the navigation buttons to scroll through options such as monitoring mode, settings, and alerts. The menu button allows access to advanced features like baseline pressure adjustments and system settings. Icons represent different functions, such as the tire icon for pressure monitoring and the gear icon for settings. Selecting an option is done by pressing the confirm button, while the back button returns you to the previous screen. The interface is designed to be user-friendly, ensuring quick access to essential features. Regularly review the interface to familiarize yourself with its layout and functionality for optimal use of the Tire Minder system.

5.3 Setting Tire Pressure Baselines

Setting tire pressure baselines ensures accurate monitoring of your tires. Open the Tire Minder TPMS app and select the baseline option. Choose each tire position and input the recommended pressure from your vehicle’s specifications. The system will store these values for continuous comparison. Ensure all tires are at the recommended pressure before setting baselines. After inputting, the system will monitor any deviations, alerting you to under or over-inflation. Regularly update baselines if you change tire types or driving conditions. This feature enhances safety and performance, ensuring your tires operate within optimal ranges. Properly set baselines are crucial for the system’s accuracy and reliability in maintaining tire health and overall vehicle safety.

5.4 Understanding Tire Pressure Alerts

The Tire Minder system alerts you to tire pressure issues through visual and audible notifications. When a tire’s pressure deviates from the set baseline, the monitor beeps, and a red light flashes. The affected tire’s position flashes on the screen for quick identification. Alerts occur for low pressure, high pressure, or high temperature (above 167°F). The system ensures timely responses to potential issues. Always check the tire immediately and adjust pressure as needed. Refer to the manual for specific guidelines on resolving alerts. Ignoring alerts can lead to tire damage or failure. Familiarize yourself with the alert system to ensure safety and proper tire maintenance. This feature is crucial for maintaining tire health and overall vehicle safety. Regular monitoring and prompt responses to alerts enhance driving safety and prevent potential hazards.

Monitoring Tire Pressure

The Tire Minder system provides real-time tire pressure and temperature monitoring, ensuring optimal tire health. It alerts users to low pressure, high pressure, or excessive heat, enabling proactive maintenance and safety.

6.1 Real-Time Tire Pressure Monitoring

The Tire Minder system offers continuous, real-time monitoring of tire pressure and temperature, providing users with up-to-the-second updates. This feature ensures that any changes in tire conditions are immediately detected, allowing for prompt action to maintain safety and performance. The system updates automatically, eliminating the need for manual checks, and alerts users to potential issues such as low pressure or high temperature. These alerts are displayed on the monitor and accompanied by audible beeps and visual indicators, ensuring that drivers are always informed. Real-time monitoring is essential for preventing tire-related accidents, improving fuel efficiency, and extending tire lifespan. By keeping a constant watch on tire health, the Tire Minder system enhances overall vehicle safety and reliability. Users can also access this data through the Tire Minder app, enabling remote monitoring and peace of mind. This feature is particularly beneficial for long trips or heavy-duty vehicle operations.

6.2 Adjusting Tire Pressure Baselines

Adjusting tire pressure baselines is a straightforward process that ensures the Tire Minder system accurately monitors tire pressure. Users can set specific pressure levels for each tire position using the Tire Minder app. To begin, open the app and navigate to the baseline mode. Select the tire positions you wish to adjust and input the recommended pressure values for each. These values should match the manufacturer’s specifications, which can be found in your vehicle’s owner’s manual or on the tire information placard. Once set, the system will monitor tire pressures relative to these baselines. It is crucial to ensure the baselines are correct, as deviations may trigger false alerts; The system allows for easy adjustments, making it ideal for vehicles with varying tire configurations or seasonal pressure changes. Adjusting baselines regularly helps maintain accurate monitoring and optimal tire performance. This feature is particularly useful for vehicles with multiple tire sets or for drivers in changing environments. By customizing baselines, users can ensure their Tire Minder system operates effectively under all conditions.

6.3 Responding to Low Tire Pressure Warnings

When the Tire Minder system detects low tire pressure, it alerts the user through visual, auditory, and vibrational cues. The monitor displays the affected tire position, accompanied by a flashing indicator and an audible beep. A red light on the monitor also illuminates to signal the issue. Users should immediately pull over to a safe location and turn off the engine. Check the tire pressure using a reliable gauge and compare it to the recommended baseline. Inflate the tire to the specified pressure if it is low. Recheck the pressure after inflating to ensure accuracy. If the issue persists, inspect the tire for damage or leaks. Reset the system through the app or monitor to clear the alert. Regular inspections and prompt responses to warnings help prevent tire damage and ensure vehicle safety. Always refer to the manual for specific reset instructions if needed. Proper response ensures optimal tire performance and longevity. Safety is paramount in such situations.

Troubleshooting Common Issues

7.1 Identifying Common Problems

The Tire Minder Manual helps users identify common issues like error codes and sensor malfunctions. It guides through troubleshooting steps and system resets for optimal performance and safety.

The Tire Minder Manual outlines common issues users may encounter, such as error codes, sensor malfunctions, or connectivity problems. It provides detailed descriptions of each problem, helping users quickly diagnose and address them. For instance, error codes like “LO” or “HI” indicate low or high battery levels, while a flashing tire position signals a pressure or temperature alert. The manual also covers system resets and calibration issues, ensuring users can resolve problems efficiently. By understanding these common issues, users can maintain optimal system performance and ensure their safety on the road. The guide emphasizes the importance of regular checks and updates to prevent recurring problems. This section is designed to empower users with the knowledge to troubleshoot confidently and effectively.

7.2 Understanding Error Codes

The Tire Minder Manual includes a detailed section on error codes to help users interpret and resolve system issues. Error codes such as “LO” or “HI” indicate low or high battery levels, while others may signal connectivity problems or sensor malfunctions. The manual provides a comprehensive list of codes, explaining their meanings and offering step-by-step solutions. For example, a flashing tire position on the monitor may indicate a pressure or temperature alert, requiring immediate attention. Users are guided to check the affected tire or recharge the device if a low-battery error occurs. Understanding these codes ensures timely resolutions, preventing potential safety risks. The manual emphasizes the importance of addressing errors promptly to maintain system accuracy and reliability. This section is essential for troubleshooting and ensuring optimal performance of the Tire Minder System.

7.3 Resetting the System

Resetting the Tire Minder System is a straightforward process designed to restore default settings and resolve operational issues. Begin by ensuring the device is fully charged to rule out low battery as the cause. Locate the small reset button on the back of the monitor, typically accessed using a pin or similar tool. Press and hold the reset button for approximately 5-10 seconds until the monitor powers off. Release the button and wait for the system to restart automatically. After the reset, the monitor may enter a learning mode, requiring you to relearn the tire sensors for accurate monitoring. If issues persist, refer to the error codes section for additional troubleshooting guidance. It’s important to follow these steps carefully to avoid any potential system malfunctions. Regular resets can help maintain optimal performance and ensure reliable tire pressure monitoring. Always consult the manual for detailed instructions specific to your model. By resetting correctly, you can restore functionality and continue monitoring your tires effectively. This process is crucial for maintaining the integrity and accuracy of the Tire Minder System, ensuring your safety on the road. If you encounter further difficulties, contacting customer support is recommended for personalized assistance. Resetting is a useful feature that helps users overcome unexpected issues without the need for advanced technical knowledge. It’s a key part of maintaining your Tire Minder System’s efficiency and effectiveness over time.

suntuf installation instructions

Introducing Suntuf‚ a durable and versatile polycarbonate roofing solution offering UV protection and lightweight installation. Ideal for various outdoor projects‚ this guide provides step-by-step instructions for a seamless Suntuf setup.

What is Suntuf?

Suntuf is a high-quality polycarbonate roofing material designed for durability and UV protection. It is lightweight‚ shatter-resistant‚ and ideal for outdoor structures like patios‚ gazebos‚ and greenhouses. Suntuf panels are easy to install and provide excellent weather resistance‚ making them a popular choice for DIY projects and professional installations alike. Their transparency allows natural light to filter through while blocking harmful UV rays‚ ensuring a pleasant and protected outdoor space. Suntuf is also available in various sizes and finishes‚ offering flexibility for different architectural needs. Its versatility and strength make it a preferred option for homeowners and builders seeking reliable roofing solutions.

Why Choose Suntuf for Your Roofing Needs?

Suntuf is an excellent choice for roofing due to its exceptional durability‚ UV resistance‚ and lightweight design. It offers superior protection against harsh weather conditions while allowing natural light to shine through. Suntuf panels are easy to install‚ making them ideal for DIY projects and professional applications. Their shatter-resistant properties ensure safety and longevity‚ while the variety of sizes and finishes provides flexibility for different architectural styles. Additionally‚ Suntuf is cost-effective and requires minimal maintenance‚ making it a practical solution for outdoor structures like patios‚ greenhouses‚ and pergolas. Its versatility and strength make it a top choice for homeowners seeking reliable and visually appealing roofing solutions.

Essential Tools and Materials Needed

Install Suntuf panels with a drill‚ screwdriver‚ measuring tape‚ and utility knife. Materials include EPDM washers‚ sealing tape‚ and closure strips for secure and weather-tight installation.

Required Tools for Suntuf Installation

For a successful Suntuf installation‚ gather essential tools like a drill with screwdriver and drill bits‚ a utility knife for cutting panels‚ and a measuring tape for accurate measurements. A screwdriver or impact driver is necessary for securing screws. Safety gear‚ such as gloves and safety glasses‚ is also crucial. Additionally‚ a chalk line or laser level ensures proper panel alignment. A ladder or scaffolding is needed for roof access‚ and a pencil or marker is handy for marking cut lines. Finally‚ a sealant gun and caulking compounds are required for sealing edges and gaps. Having these tools ready ensures a smooth and efficient installation process.

Mandatory Safety Equipment

Ensuring safety is paramount during Suntuf installation. Wear protective gear such as gloves‚ safety glasses‚ and a hard hat to prevent injuries. Steel-toe boots are recommended for foot protection. Use a sturdy ladder or scaffolding with proper anchorage to avoid falls. A harness or fall-arrest system is essential when working at heights. Keep a first-aid kit nearby and ensure someone is available to assist in case of emergencies. Avoid working in extreme weather conditions like heavy rain or strong winds. Proper ventilation is crucial when using sealants or adhesives. Always follow manufacturer guidelines for safety equipment to ensure a secure and injury-free installation process.

Preparation Steps Before Installation

Assess the structure‚ clear debris‚ and ensure the surface is level. Check for damage and verify measurements. Prepare tools and materials for a smooth process.

Measuring Your Structure

Accurate measurements are crucial for a successful Suntuf installation. Start by measuring the width of your structure to determine the number of panels required. Divide the width by 760mm to calculate the exact quantity needed. Ensure the structure is square by checking the diagonal measurements‚ and use a bubble level to confirm it is even. Measure the length to determine the number of supporting beams or rafters. Take note of any obstructions‚ such as vents or skylights‚ and plan around them. Double-check all measurements to avoid errors during installation. For precise cuts‚ use a laser measuring tool. Proper measurement ensures a seamless fit and prevents material waste.

Preparing the Roofing Area

Before installing Suntuf panels‚ ensure the roofing area is clean and clear of debris. Remove any existing materials‚ dirt‚ or obstructions to create a smooth surface. Check for uneven areas and address them to ensure proper panel alignment. If working on an existing roof‚ inspect for damaged or rotten wood and replace it if necessary. Apply a layer of recommended silicone sealant or roofing underlayment to protect the surface and improve panel adhesion. Ensure all rafters or support beams are securely in place and level. Use a broom or pressure washer to remove dust and dirt‚ ensuring a clean surface for installation. Proper preparation ensures a secure and even fit for the Suntuf panels.

Step-by-Step Installation Process

Begin by measuring and cutting Suntuf panels to fit your structure‚ then place them securely‚ ensuring proper alignment and spacing. Fasten panels with approved fasteners‚ pre-drilling to prevent cracking.

Measuring and Cutting Suntuf Panels

Begin by measuring the width of your structure to determine the number of Suntuf panels required. Divide the width by 760mm to calculate the exact quantity needed. Use a tape measure to mark the panels accurately‚ ensuring precise cuts. Cut the panels using a fine-tooth saw or circular saw‚ taking care to wear protective gear like gloves and safety glasses. For curved structures‚ check if the panels can cold curve to fit your design. Always pre-drill holes for fasteners to prevent cracking. Store panels in a shaded area‚ away from direct sunlight‚ before installation. Proper measuring and cutting ensure a seamless fit and professional finish.

Placing the Panels on the Roof

Once cut to size‚ carefully carry the Suntuf panels to the roof‚ ensuring they are not damaged during transport. Align the panels with the roof structure‚ starting from one end and working across. Ensure proper overhang for water runoff and align the corrugations correctly. Place each panel with the UV-protected side facing outward‚ as indicated by the label. Secure the panels temporarily with fasteners‚ spacing them evenly as recommended. Check alignment and adjust as needed to maintain a straight‚ even appearance. For curved roofs‚ verify the panels can cold curve to fit the design. Proper placement ensures structural integrity and a professional finish‚ adhering to the manufacturer’s guidelines for optimal performance.

Securing the Panels Properly

Once the panels are correctly positioned‚ secure them using approved fasteners and EPDM rubber washers to ensure a watertight seal. Predrill holes for fasteners to avoid damaging the panels. Space fasteners evenly‚ typically every 12-24 inches‚ depending on the roof’s pitch and design. Tighten each fastener firmly but avoid overtightening‚ which could warp the panels. Double-check that all panels are aligned and seated properly in their channels. Ensure the UV-protected side is always facing outward to maintain durability. Use silicone sealant around edges and gaps for added protection. Follow the manufacturer’s torque specifications to prevent over-tightening‚ which can compromise the panel’s integrity. Proper securing ensures long-lasting performance and weather resistance.

Post-Installation Procedures

After installation‚ seal all edges and gaps with silicone sealant. Conduct a final inspection to ensure panels are securely fastened and properly aligned. Address any gaps or leaks promptly to ensure optimal performance and longevity. Follow manufacturer guidelines for post-installation checks and touch-ups to maintain the integrity of your Suntuf roofing system.

Sealing the Edges and Gaps

Sealing edges and gaps is crucial for ensuring a watertight and secure Suntuf installation. Begin by applying a high-quality silicone sealant to all panel edges‚ overlaps‚ and connections. Use a caulking gun for precise application‚ ensuring complete coverage. Wipe off excess sealant with a clean cloth to avoid unevenness. For larger gaps‚ consider using weatherproof tape or additional sealing strips. Inspect every seam and joint to confirm no air or water can penetrate. Allow the sealant to cure fully before exposing the structure to rain or heavy weather. Regular inspections and resealing as needed will maintain the integrity of your Suntuf roofing system over time.

Final Inspection and Touch-ups

After completing the Suntuf installation‚ conduct a thorough final inspection to ensure all panels are properly aligned‚ securely fastened‚ and free from damage. Check that all fasteners are tightened evenly and that no gaps remain between panels or at the edges. Verify that all edges are sealed correctly to prevent water infiltration. Address any minor issues‚ such as scratches or small gaps‚ using silicone sealant or touch-up paint as needed. Test the structure under light weather conditions to ensure water runs off smoothly. Finally‚ clean the panels with a mild detergent to remove dirt or residue‚ ensuring clarity and UV protection. A final walk-through will help identify any overlooked details‚ ensuring a professional and durable finish.

Maintenance and Care Tips

Regularly clean Suntuf panels with a mild detergent to maintain clarity and durability. Inspect for loose fasteners and tighten as needed. Avoid abrasive materials to prevent scratches‚ ensuring long-lasting UV protection and structural integrity.

Cleaning and Regular Inspections

Regular cleaning and inspections are crucial for maintaining the longevity and performance of Suntuf panels. Use a mild detergent mixed with warm water and a soft cloth or sponge to wipe down the panels‚ avoiding abrasive materials that could scratch the surface. Inspect the panels for debris‚ dirt‚ or stains‚ and clean them every few months‚ especially after heavy weather conditions. Check for loose fasteners and ensure all connections are secure. Look for signs of damage‚ such as cracks or discoloration‚ and address them promptly. Proper maintenance prevents damage and ensures the panels remain clear and functional. Regular care also helps maintain UV protection and structural integrity.

Handling Repairs and Replacements

For damaged Suntuf panels‚ inspections should be conducted promptly to prevent further issues. Look for cracks‚ discoloration‚ or loose fasteners‚ and address them immediately. Small scratches can be buffed out‚ while larger cracks may require panel replacement. When replacing a panel‚ ensure the surrounding area is clear and secure. Use Palram-approved fasteners and sealants to maintain water-tightness. Remove damaged panels carefully to avoid additional stress on the structure. Reinstall new panels following the manufacturer’s guidelines‚ ensuring proper alignment and sealing. Regularly check for wear and tear to prevent costly repairs. Addressing issues early helps maintain the integrity and longevity of your Suntuf roofing system.

Troubleshooting Common Issues

Identify leaks by checking panel alignment and sealing gaps. Misaligned panels can cause water leakage and structural strain. Inspect for cracks and loose fasteners regularly.

Addressing Leaks and Damages

To address leaks and damages during Suntuf installation‚ inspect panel alignment and sealing gaps. Ensure all fasteners are securely tightened and properly spaced. Check for cracks or punctures in the panels‚ which may require replacement. Verify that the UV-protected side is facing outward‚ as incorrect installation can lead to premature wear. Remove protective tapes after installation to prevent adhesion issues. For minor damages‚ clean the area thoroughly and apply a compatible sealant. For larger cracks‚ consider replacing the damaged panel entirely. Always use Palram-approved accessories‚ such as EPDM rubber washers and silicone sealants‚ to maintain waterproofing. Regular inspections and timely repairs will ensure the longevity and integrity of your Suntuf roofing system.

Fixing Misaligned Panels

If Suntuf panels become misaligned‚ start by carefully inspecting the installation area. Check if the panels are properly seated in the framing channels. Gently lift or adjust the panels to ensure they align correctly‚ using a spirit level to confirm even positioning. Loosen any over-tightened fasteners that may be causing misalignment. Re-seat the panels firmly into the channels‚ ensuring they are flush and evenly spaced. Tighten the fasteners gradually‚ working from one end to the other to prevent further misalignment. Use Palram-approved fasteners and follow the manufacturer’s guidelines for proper torque. Regularly inspect and adjust panels during installation to maintain structural integrity and avoid future issues.

With proper planning and execution‚ Suntuf installation offers a durable‚ UV-protected roofing solution. Follow instructions carefully for a seamless and satisfying project outcome.

Final Thoughts on Suntuf Installation

Installing Suntuf panels is a rewarding project that enhances outdoor spaces with durability and style. By following the guide‚ you ensure a sturdy‚ UV-protected roof. Proper preparation and precise measurements are key to a seamless setup. Regular maintenance‚ such as cleaning and inspections‚ extends the lifespan of your Suntuf roof. Troubleshooting common issues like leaks or misaligned panels is straightforward with the right tools and techniques. With Suntuf‚ you achieve a lightweight‚ weather-resistant solution perfect for patios‚ greenhouses‚ or gazebos. The end result is a functional and aesthetically pleasing roof that withstands the elements‚ providing years of reliable service.

nfpa 1999 pdf free download

NFPA 1999 provides critical standards for protective clothing and equipment for EMS personnel, ensuring safety during emergency medical operations․ Published by the National Fire Protection Association, it outlines essential requirements for EMS gear to protect against hazards․ The standard is freely accessible on the NFPA website, offering a downloadable PDF for easy reference․ This document is vital for EMS organizations to maintain compliance and ensure personnel safety․

1․1 Overview of NFPA 1999

NFPA 1999, Standard on Protective Clothing and Protective Equipment for Emergency Medical Operations, provides detailed requirements for EMS protective gear․ It ensures that emergency medical responders have adequate protection from hazards such as bloodborne pathogens, chemicals, and physical injuries․ The standard covers various types of protective clothing, including gloves, gowns, and face protection, while addressing both single-use and reusable equipment․ NFPA 1999 is designed to balance protection with mobility and comfort, enabling EMS personnel to perform their duties safely and effectively․ Regular updates ensure the standard aligns with evolving medical and safety practices, making it a critical resource for EMS organizations worldwide․

1․2 Importance of NFPA 1999 for Emergency Medical Services (EMS)

NFPA 1999 is crucial for EMS as it establishes standards for protective clothing and equipment, ensuring EMS personnel are safeguarded against biological, chemical, and physical hazards․ The standard addresses the unique risks faced by emergency medical responders, providing guidelines for gear that balances protection with mobility․ Compliance with NFPA 1999 helps EMS organizations maintain safety protocols, reducing the risk of occupational injuries and illnesses․ By adhering to these standards, EMS teams can better prepare for emergencies, ensuring both patient and provider safety․ The free PDF download of NFPA 1999 makes it accessible for all EMS agencies to implement these critical safety measures effectively․

Key Features of NFPA 1999

NFPA 1999 specifies performance requirements for EMS protective clothing, ensuring protection from hazardous environments․ It includes testing methods and updates to enhance safety and functionality for emergency responders․

2․1 Performance Requirements for Protective Clothing

NFPA 1999 establishes rigorous performance requirements for EMS protective clothing, ensuring materials and designs provide optimal protection against hazardous environments․ The standard specifies criteria for durability, breathability, and resistance to pathogens, chemicals, and physical hazards․ It also addresses the performance of multiple-use gloves, which must meet specific standards for dexterity and barrier protection․ Additionally, NFPA 1999 includes requirements for clothing that offers limited protection against chemical, biological, radiological, and nuclear (CBRN) agents․ These requirements are verified through comprehensive testing protocols, ensuring EMS personnel have reliable protection during emergency operations․ Compliance with these standards is crucial for safeguarding EMS workers in high-risk situations, making NFPA 1999 a cornerstone of EMS safety practices․

2․2 Testing Methods for EMS Gear

NFPA 1999 outlines rigorous testing methods to evaluate the performance and safety of EMS gear․ These methods include assessments for durability, resistance to pathogens, chemicals, and physical hazards․ Testing protocols ensure that protective clothing and equipment meet specified standards for tensile strength, puncture resistance, and thermal protection․ Additionally, multiple-use gloves are tested for dexterity, barrier integrity, and resistance to viral penetration․ The standard also includes testing for limited protection against chemical, biological, radiological, and nuclear (CBRN) agents․ These tests are designed to simulate real-world emergency conditions, ensuring EMS gear provides reliable protection․ Compliance with these testing methods is essential for maintaining the safety and effectiveness of EMS personnel in high-risk environments․

2․3 Updates in the Latest Edition

The latest edition of NFPA 1999 introduces updated testing protocols and enhanced requirements for EMS protective gear; It includes new standards for multiple-use gloves, ensuring improved durability and resistance to pathogens․ Additionally, the standard now incorporates updated criteria for chemical, biological, radiological, and nuclear (CBRN) protection, reflecting modern threats․ The revised edition also clarifies requirements for thermal and flame resistance, ensuring better safety for EMS personnel in fire-related emergencies․ These updates align with advancements in material science and emerging risks, providing a more comprehensive framework for EMS gear․ The updated standard is available for free download, ensuring easy access for organizations to stay compliant and informed․

Accessing NFPA 1999

NFPA 1999 is accessible via the NFPA website, offering free access to the standard in PDF format for easy download and reference․

3․1 Official Sources for NFPA Standards

The official source for NFPA standards, including NFPA 1999, is the NFPA website․ This platform provides direct access to all NFPA documents, ensuring authenticity and reliability․ The website offers a user-friendly interface where users can search for specific standards using the docinfo page or by utilizing the search feature․ NFPA standards are widely recognized and adhered to, making the official website the most trusted source for downloading the NFPA 1999 PDF․ Additionally, the NFPA website regularly updates its standards to reflect the latest advancements in safety protocols and technologies․

3․2 Free Resources from NFPA

NFPA offers free resources to support understanding and implementation of its standards․ The official NFPA website provides complimentary access to NFPA 1999 and other essential documents through its Free Access program․ This initiative ensures that critical safety information is widely available to the public, promoting compliance and safety practices․ Additionally, NFPA offers free training materials, guides, and webinars to help users interpret and apply the standards effectively․ These resources are invaluable for EMS professionals and organizations aiming to stay informed and compliant with the latest safety protocols․

3․3 How to Download NFPA 1999 PDF

To access the NFPA 1999 PDF, visit the official NFPA website and navigate to the “Standards” section․ Use the search feature to find NFPA 1999, then click on the document to view its details․ Create a free NFPA account or log in if you already have one․ Under the “Access” tab, you’ll find an option to view or download the standard․ NFPA offers free access to its standards, including NFPA 1999, through its Free Access Program․ This allows users to download the PDF version for easy reference and offline use, ensuring compliance and understanding of the standard․

Benefits of the PDF Format

The NFPA 1999 PDF offers enhanced accessibility, portability, and offline use․ It ensures easy navigation, searchability, and quick reference, making it ideal for emergency situations and field operations․
The digital format allows for efficient updates and revisions, keeping users informed of the latest safety standards and guidelines․

4․1 Accessibility and Portability

The NFPA 1999 PDF is designed to be highly accessible and portable, ensuring that emergency medical services (EMS) personnel can easily access critical safety standards․ The digital format allows users to download the document from the NFPA website and store it on various devices, including smartphones, tablets, and laptops․ This portability enables EMS workers to review the standard in the field, during training, or in emergency situations without relying on physical copies․ The PDF’s accessibility features also make it possible to share the document quickly among team members, promoting uniform compliance with safety protocols․ Additionally, the downloadable nature of the PDF ensures that users can access the standard even without internet connectivity, making it an indispensable resource for emergency response scenarios․

4․2 Searchability and Navigation

The NFPA 1999 PDF offers enhanced searchability and navigation features, making it easier for users to locate specific information quickly․ The document is fully searchable, allowing users to find keywords, sections, or requirements using built-in PDF tools․ This feature is particularly useful for emergency medical services (EMS) personnel who need rapid access to critical safety standards․ The PDF also includes bookmarks and a detailed table of contents, enabling users to navigate seamlessly between sections․ Hyperlinks within the document further improve accessibility, ensuring that users can jump to referenced sections or external resources instantly․ These features collectively enhance the usability of the standard, making it an indispensable tool for EMS operations and training․ The ability to search and navigate efficiently saves time and ensures compliance with safety protocols during emergencies․

4․4 Offline Access for Emergencies

The NFPA 1999 PDF allows for offline access, which is crucial during emergencies where internet connectivity may be unreliable․ EMS personnel can download the document and access critical safety standards without delays, ensuring uninterrupted compliance with protocols․ Offline access is particularly vital in remote or disaster scenarios where communication networks may be disrupted․ The PDF format ensures that the standard remains available on any device, providing a reliable resource for emergency medical operations․ This feature enhances preparedness and response efficiency, as EMS teams can reference the document anytime, anywhere, without dependence on internet services․ Offline access is a key advantage of the NFPA 1999 PDF, supporting timely and informed decision-making in high-stakes situations․

Compliance and Implementation

Compliance with NFPA 1999 is essential for ensuring EMS personnel safety and operational effectiveness․ The standard provides clear guidelines for implementing protective clothing requirements, aiding organizations in maintaining adherence to safety protocols․

5․1 Understanding Compliance Requirements

Compliance with NFPA 1999 involves adhering to specific standards for EMS protective clothing and equipment․ The standard outlines detailed requirements for materials, design, and testing to ensure gear provides adequate protection against hazards․ Understanding these requirements is crucial for EMS organizations to select appropriate gear and maintain safety protocols․ The free PDF version of NFPA 1999, available on the NFPA website, offers comprehensive guidelines, making it easier for organizations to grasp and implement the necessary standards effectively․

5․2 Steps to Implement NFPA 1999 in EMS Operations

Implementing NFPA 1999 in EMS operations involves several key steps․ First, access the standard through the NFPA website to review its requirements․ Conduct a needs assessment to identify gaps in current protective gear․ Purchase equipment that meets NFPA 1999 specifications, ensuring compliance with performance and testing criteria․ Develop a training program to familiarize staff with the new gear and its proper use․ Establish protocols for regular inspection and maintenance of equipment․ Finally, document compliance and stay updated on any revisions to the standard to maintain ongoing adherence to safety guidelines․

Related Standards and Resources

NFPA 1999 is complemented by other standards like NFPA 1300 for community risk reduction․ Additional resources, including training materials and guides, are available on the NFPA website․

6․1 NFPA 1999 and Other EMS-Related Standards

NFPA 1999 aligns with other EMS standards to ensure comprehensive safety․ For instance, NFPA 1300 focuses on community risk reduction, while ANSI/ISEA 107 addresses high-visibility apparel․ Together, these standards create a robust framework for EMS operations, ensuring personnel are protected and equipped for various emergencies․ The NFPA website offers free access to these documents, allowing organizations to maintain compliance and enhance safety protocols․ Additionally, cross-referencing these standards provides a holistic approach to emergency medical response, ensuring all aspects of safety are covered․

6․2 Additional Training Materials

Beyond the NFPA 1999 standard, various training resources are available to enhance understanding and implementation․ The NFPA website offers free access to curriculum materials, such as fire safety trailers, which provide hands-on training for emergency responders․ Additionally, the NFPA 99 Handbook and other guides offer detailed insights and FAQs to support compliance․ Training modules and webinars are also accessible, covering topics like risk assessment and emergency preparedness․ These materials complement the NFPA 1999 standard, ensuring EMS personnel are well-equipped to handle emergencies effectively․ Such resources emphasize practical application, making them invaluable for ongoing professional development in emergency medical services․

NFPA 1999 is essential for EMS safety, providing clear guidelines for protective gear․ Its free PDF availability ensures widespread access, promoting compliance and enhancing emergency response effectiveness nationwide․

7․1 Summary of Key Points

NFPA 1999 establishes standards for EMS protective clothing, ensuring safety during emergencies․ Available as a free PDF on the NFPA website, it provides accessible guidelines for compliance․ Key points include performance requirements, testing methods, and updates in the latest edition․ The standard emphasizes protection against various hazards, making it crucial for EMS operations․ By following NFPA 1999, organizations can ensure personnel safety and effective emergency response․ Regular updates and free access make it a vital resource for staying informed and maintaining compliance in the field of emergency medical services․

7․2 Final Thoughts on NFPA 1999

NFPA 1999 is a cornerstone standard for EMS protective clothing, ensuring safety and compliance in emergency medical operations․ Its availability as a free PDF underscores NFPA’s commitment to accessibility․ The standard’s focus on performance requirements and testing ensures gear meets rigorous safety benchmarks․ Regular updates reflect evolving challenges in EMS, making it indispensable for modern operations․ By adhering to NFPA 1999, organizations prioritize personnel safety and effective emergency response․ As a critical resource, it remains essential for staying informed and maintaining compliance in the ever-changing landscape of emergency medical services․ Accessing the PDF from official sources ensures reliability and up-to-date information․

Staying Updated

Regular updates ensure compliance with the latest safety standards․ Visit the NFPA website or subscribe to their newsletter for the newest editions of NFPA 1999 and stay informed․

8․1 Importance of Regular Updates

Regular updates to NFPA 1999 are crucial for EMS personnel to stay informed about the latest safety standards and technological advancements․ These updates often include new testing methods, improved material requirements, and enhanced protective measures․ By staying updated, EMS teams can ensure they meet compliance standards, providing optimal protection during emergency operations․ Updates also reflect changes in industry best practices and address emerging threats, making them essential for maintaining operational safety and effectiveness․ Regularly checking for revisions ensures that EMS organizations remain prepared to handle a wide range of emergency scenarios with the most current and reliable protective gear available․

8․2 How to Stay Informed About Revisions

Staying informed about revisions to NFPA 1999 is straightforward through various channels․ The NFPA website offers free access to updated standards, including a downloadable PDF of NFPA 1999․ Subscribers can also receive email alerts for new editions and revisions․ Additionally, attending NFPA seminars and workshops provides insights into recent changes․ The NFPA Free Access platform ensures users have the latest version of the standard․ Regularly reviewing the NFPA website and participating in training programs are effective ways to stay updated, ensuring compliance and operational safety for EMS teams․ This proactive approach guarantees that personnel are always equipped with the most current safety guidelines․

kozy heat fireplace remote manual

Welcome to the Kozy Heat Fireplace Remote Control guide. This essential tool enhances your fireplace experience with convenient operation‚ flame modulation‚ and smart temperature control for optimal comfort.

Overview of the Kozy Heat Remote Control System

The Kozy Heat Remote Control System is a sophisticated tool designed to enhance your fireplace experience. It allows seamless control over various functions‚ including flame height‚ fan speed‚ and temperature settings. The system features the Komfort 8K Remote‚ which offers multifunctional control‚ enabling you to manage your fireplace’s pilot light‚ burner‚ and auxiliary functions effortlessly. With its advanced thermostat capabilities‚ the remote can automatically adjust the room temperature‚ ensuring optimal comfort. The system also includes smart modes that modulate flame height based on temperature settings‚ providing efficient heat distribution. Additionally‚ the remote incorporates idle mode to conserve battery life when not in use‚ making it both convenient and energy-efficient.

Importance of the Remote Manual for Optimal Fireplace Operation

The remote manual is essential for maximizing the performance and safety of your Kozy Heat fireplace. It provides detailed instructions for installing‚ operating‚ and maintaining the remote control system‚ ensuring proper function and longevity. The manual guides users through initial setup‚ syncing the remote with the fireplace‚ and troubleshooting common issues. It also outlines safety precautions and maintenance routines‚ helping users avoid potential hazards and maintain efficiency. By following the manual‚ users can fully utilize advanced features like smart mode and thermostat operation‚ ensuring a seamless and enjoyable fireplace experience. Referencing the manual is crucial for optimal performance and to prevent errors that could compromise safety or functionality.

Installation and Setup

Begin by setting the main ON/OFF rocker switch to ON for remote control operation. Sync the remote with your fireplace by following the manual’s pairing instructions. Ensure batteries are properly installed in the remote for reliable functionality. Always refer to the manual for specific setup guidance to ensure safe and efficient operation of your Kozy Heat fireplace system.

Understanding the Components of the Remote Control

The Kozy Heat remote control is designed with user-friendly features to enhance your fireplace experience. Key components include the ON/OFF button‚ flame height adjustment‚ and thermostat controls. The remote also features a fan mode for heat distribution and a smart mode for automated temperature regulation. A clear LCD display provides real-time feedback on settings and modes. Additional buttons allow for precise control over flame modulation and auxiliary functions. The remote is powered by batteries‚ typically located in an accessible compartment. Understanding these components ensures seamless operation and customization of your fireplace experience. Always refer to the manual for detailed descriptions and specific functionality of each button and feature.

Initial Setup for the Remote Control System

Setting up your Kozy Heat remote control system is straightforward. First‚ ensure the main ON/OFF rocker switch on your fireplace is in the ON position to enable remote functionality. Next‚ insert the batteries into the remote control‚ typically located in the battery compartment. Replace the compartment cover securely. Turn on the remote by pressing and holding the ON button until the LCD display activates. Ensure the remote is in the correct mode for your fireplace‚ such as manual or smart mode. Refer to the manual for specific instructions on syncing the remote with your fireplace‚ as this step may vary depending on the model. Proper setup ensures smooth operation and full customization of your fireplace features.

Syncing the Remote Control with the Fireplace

To sync your Kozy Heat remote control with the fireplace‚ start by ensuring the fireplace is turned on using the main ON/OFF rocker switch. Press and hold the “ON” button on the remote until the LCD display lights up. Next‚ locate the pairing button on your fireplace‚ usually found near the control module. Press and hold this button until the remote control enters pairing mode‚ indicated by a blinking LED or a beep. Release the pairing button and wait for the remote to automatically sync with the fireplace. Once synced‚ the remote will respond to commands‚ and the LED will stop blinking. If syncing fails‚ repeat the process or refer to the manual for troubleshooting tips.

Operating Instructions

Learn to operate your Kozy Heat fireplace with ease. The remote allows you to turn the fireplace on/off‚ adjust flame height‚ activate fan mode‚ and set thermostat preferences for optimal comfort.

Basic Operations: Turning the Fireplace ON/OFF

To turn your Kozy Heat fireplace on or off using the remote control‚ follow these simple steps. First‚ ensure the main ON/OFF rocker switch is in the ON position to enable remote functionality. Next‚ locate the ON/OFF button on your remote control‚ typically marked clearly for easy access. Press and hold the button until the fireplace ignites or shuts down completely. For safety‚ always allow the fireplace to cool down before adjusting or cleaning. Remember to turn off the fireplace when not in use to conserve energy and ensure safe operation. This basic operation is essential for everyday use and maintaining your fireplace’s efficiency.

Adjusting Flame Height and Modulation

Adjusting the flame height and modulation on your Kozy Heat fireplace is a straightforward process using the remote control. Start by ensuring the fireplace is turned on using the ON/OFF button. To adjust the flame height‚ use the up and down arrow buttons on the remote. Pressing the up arrow increases the flame height‚ making the flames taller and more intense‚ while pressing the down arrow decreases the flame height‚ making the flames shorter and less intense.

Modulation refers to the amount of fuel flowing to the fireplace‚ which affects both flame height and heat output. The remote control allows you to fine-tune the flame modulation by pressing and holding the flame adjustment button. This feature ensures you can customize the fire’s appearance and heat output to your preference. Additionally‚ some models offer smart modes or thermostat functionality‚ where the remote can automatically adjust the flames based on the room’s temperature. For manual adjustments‚ use the remote’s buttons to override automatic settings temporarily. Always ensure the remote is synced with the fireplace for smooth operation and consider safety precautions when adjusting flames‚ especially around children or pets.

Using the Fan Mode for Optimal Heat Distribution

The fan mode on your Kozy Heat fireplace remote control enhances heat circulation‚ ensuring warmth is evenly distributed throughout the room. Activate the fan by pressing the designated button on the remote. This feature improves air flow‚ reducing cold spots and maximizing comfort. The fan operates independently of the flames‚ allowing you to circulate heat even when the fire is low or off. For energy efficiency‚ use the fan to spread heat without increasing the fireplace’s output‚ making it a practical option for maintaining a cozy environment.

Adjust the fan speed using the remote’s controls to customize air flow. Lower settings are ideal for smaller spaces‚ while higher settings are better for larger rooms. The fan mode works seamlessly with the thermostat‚ ensuring consistent temperatures and optimal heat distribution. Regularly cleaning the fan and vents ensures efficient operation and prevents dust buildup‚ which can reduce performance. Always refer to the manual for specific instructions on fan mode operation and maintenance to keep your fireplace running smoothly and safely.

Thermostat Modes: Smart and Manual Operation

The Kozy Heat remote control offers both Smart and Manual thermostat modes for tailored temperature management. In Smart Mode‚ the system automatically adjusts flame height and heat output to maintain your desired temperature‚ optimizing efficiency and comfort. This mode is ideal for hands-free operation‚ as it learns your preferences over time; For precise control‚ Manual Mode allows you to adjust the thermostat settings directly‚ ensuring the fireplace operates exactly as you want. Switch between modes using the remote’s dedicated buttons‚ and monitor the temperature on the LCD display. Use Smart Mode for energy-saving automation or Manual Mode for personalized adjustments‚ ensuring your fireplace delivers consistent warmth and ambiance.

Remote Control Features

The Kozy Heat remote control features include flame height modulation‚ fan mode‚ and thermostat capabilities for precise temperature control. The Komfort 8K remote offers smart automation and manual overrides‚ ensuring seamless operation and enhanced comfort year-round.

Overview of the Komfort 8K Remote Control

The Komfort 8K Remote Control is a multifunctional device designed for Kozy Heat fireplaces. It allows users to regulate flame height‚ fan speed‚ and auxiliary functions. The remote also functions as a thermostat‚ enabling automatic temperature control for consistent comfort. With features like smart mode and manual operation‚ it offers flexibility. Additionally‚ it supports fan mode for optimal heat distribution. The remote is user-friendly‚ with an intuitive interface for easy operation. It enhances the overall fireplace experience by providing precise control over various functions. Proper setup and syncing with the fireplace ensure seamless performance. This remote is a key component for maximizing the efficiency and enjoyment of your Kozy Heat fireplace‚ making it an essential accessory for homeowners seeking convenience and comfort.

Smart Mode for Automated Temperature Control

The Smart Mode on the Kozy Heat remote control offers advanced automation for temperature regulation. It allows the fireplace to adjust flame height and heat output based on the room’s temperature‚ ensuring consistent comfort. This mode learns the room’s thermal profile and modulates the burner to maintain the desired temperature. Users can set a temperature range from 45°F to 90°F (7°C to 32°C). The remote switches between manual and smart operation seamlessly‚ providing flexibility. Smart Mode optimizes energy efficiency by minimizing unnecessary heat output. It also ensures a cozy environment without constant manual adjustments. This feature is ideal for homeowners seeking a hands-free‚ efficient fireplace experience with precise temperature control and enhanced comfort.

Maintenance and Troubleshooting

Regular maintenance ensures optimal performance of your Kozy Heat remote control. Clean the remote’s buttons and replace batteries annually. Troubleshoot common issues like signal loss by syncing the remote and checking battery life.

Routine Maintenance for the Remote Control

To ensure your Kozy Heat remote control functions optimally‚ regular maintenance is essential. Start by replacing the batteries annually or when the remote shows low battery signals. Clean the buttons gently with a soft cloth to remove dirt or debris that may interfere with functionality. Check for any obstructions between the remote and the fireplace receiver‚ as these can disrupt signal transmission. Additionally‚ sync the remote with the fireplace periodically to maintain proper communication. For advanced troubleshooting‚ refer to the manual for resetting or recalibrating the system. Routine maintenance ensures reliable operation and extends the lifespan of your remote control.

Troubleshooting Common Remote Control Issues

If your Kozy Heat remote control isn’t functioning properly‚ start by checking the batteries. Weak or dead batteries often cause connectivity issues. Ensure the remote is in range and line of sight with the fireplace receiver. If buttons are sticky or unresponsive‚ clean them with a soft cloth. Verify the rocker switch is in the “ON” position for remote operation. If the remote still doesn’t work‚ reset the system by turning off the fireplace and disconnecting power for 30 seconds. Re-sync the remote with the fireplace following the manual’s instructions. For persistent issues‚ consult the troubleshooting section or contact a certified technician for assistance. Regular maintenance can prevent many of these common problems‚ ensuring smooth operation of your remote control.

Safety Precautions

Always ensure the fireplace is turned off and cooled before maintenance. Keep flammable materials away and follow manual guidelines for safe remote control operation and installation.

General Safety Guidelines for Fireplace Operation

Ensure the fireplace is turned off and completely cooled before performing any maintenance. Always keep flammable materials‚ such as curtains or furniture‚ at a safe distance from the fireplace. Proper ventilation is essential to avoid carbon monoxide buildup‚ so inspect and clean vents regularly. Never leave children or pets unattended near an operating fireplace. Follow the manufacturer’s instructions for remote control operation and installation. Avoid overloading the fireplace with excessive fuel‚ and never use accelerants like gasoline. Keep the remote control out of reach of children to prevent accidental activation. Regularly inspect the fireplace and chimney for damage or wear. Consult a professional for any repairs or installations to ensure safety standards are met. Adhere to all local fire safety regulations and guidelines provided in the manual for optimal and secure fireplace operation.

Remote Control Safety Features

The Kozy Heat remote control incorporates advanced safety features to ensure secure operation of your fireplace. An automatic shut-off function activates if the fireplace detects unusual conditions‚ such as high temperatures or gas leaks. Child safety locks prevent accidental activation‚ providing peace of mind for families. The remote also features a low-battery indicator to alert users when power is running low‚ ensuring uninterrupted control. Overheat protection automatically reduces flame intensity if the room temperature exceeds a safe level. Additionally‚ the remote is designed with fail-safe mechanisms that disable operation if communication with the fireplace is lost. These features work together to create a safe and reliable fireplace experience‚ aligning with industry standards for home safety and comfort.

Advanced Features

Explore advanced features like smart temperature controls‚ flame modulation‚ and timed operations. These innovations enhance your fireplace experience‚ offering precision and convenience for optimal comfort and efficiency.

Thermostat Operation and Temperature Settings

The Kozy Heat remote control features a built-in thermostat‚ allowing for precise temperature regulation. Users can set their preferred temperature range‚ typically between 45°F and 90°F‚ ensuring consistent comfort. The thermostat operates in both manual and smart modes. In manual mode‚ the fireplace runs continuously until the desired temperature is reached‚ while smart mode adjusts flame height and heat output automatically for efficient heating. Additionally‚ the remote allows for scheduling and timed operations‚ enabling users to pre-set their heating preferences. This advanced temperature control system ensures energy efficiency and optimal warmth‚ making it a standout feature of the Kozy Heat fireplace remote control.

Flame Adjustment and Heat Modulation

The Kozy Heat remote control offers precise flame adjustment‚ allowing users to customize their fireplace experience. With up to five distinct flame levels‚ you can easily modify the intensity of the fire to suit your comfort needs. Heat modulation is seamlessly integrated‚ enabling the fireplace to adjust its output based on the selected flame height. This feature ensures efficient heating while maintaining a consistent and inviting ambiance. The remote also allows for smooth transitions between settings‚ providing a user-friendly experience. By combining flame adjustment with heat modulation‚ the Kozy Heat system delivers both aesthetics and functionality‚ making it easy to enjoy your fireplace year-round with optimal control and energy efficiency.

Additional Resources

Access comprehensive guides‚ manuals‚ and video tutorials for your Kozy Heat Fireplace. Visit the official website or authorized dealers for downloadable resources and expert support.

Downloading the Kozy Heat Fireplace Manual

Downloading the Kozy Heat Fireplace manual is a straightforward process. Visit the official Kozy Heat website or authorized dealer platforms to access the manual. Search for your specific fireplace model‚ such as the Komfort 8K or TRF-41‚ to ensure you get the correct guide. The manual covers installation‚ operation‚ and maintenance tips‚ as well as troubleshooting common issues. Additionally‚ the manual provides detailed instructions for syncing and using your remote control effectively. For convenience‚ you can download the manual in PDF format or print it for easy reference. This resource is essential for optimal performance and safety‚ ensuring you get the most out of your fireplace experience.

Video Tutorials for Remote Control Setup and Use

Video tutorials are an excellent resource for mastering the setup and operation of your Kozy Heat Fireplace Remote Control. These tutorials provide step-by-step guidance on syncing the remote with your fireplace‚ adjusting flame height‚ and using thermostat modes. Additionally‚ they cover advanced features like smart mode and fan operation. Available on the official Kozy Heat website and authorized dealer platforms‚ these videos are designed to help you troubleshoot common issues and optimize your fireplace experience. By following these tutorials‚ you can ensure proper installation‚ maintenance‚ and operation of your remote control system. They are a valuable complement to the manual‚ offering visual and hands-on instruction for seamless control of your fireplace.

With the Kozy Heat Fireplace Remote Control‚ enjoy enhanced comfort and convenience. Follow the manual and video tutorials for seamless operation and optimal fireplace performance.

Final Tips for Maximizing Your Fireplace Experience

To maximize your fireplace experience‚ ensure proper setup and sync your remote control with the fireplace. Regularly clean the remote and replace batteries as needed. Adjust flame height and modulation for optimal ambiance and heat. Use the fan mode for even heat distribution and engage the thermostat for smart temperature control. Refer to the manual or video tutorials for troubleshooting common issues. Always follow safety guidelines and maintain your fireplace to ensure long-lasting performance. By mastering these tips‚ you can enjoy a cozy‚ efficient‚ and safe fireplace experience year-round.

gaps diet meal plan pdf

1.1 Overview of the GAPS Diet

1.2 Benefits of the GAPS Diet

The GAPS Diet offers numerous benefits, including improved digestive health by healing the gut lining, reducing inflammation, and enhancing nutrient absorption. It can alleviate symptoms of conditions like ADHD, autism, and depression, promoting mental clarity and overall well-being. Many followers report significant improvements in their health, making the GAPS Diet a valuable approach for those seeking to address both physical and mental health challenges effectively through dietary changes.

1.3 Who Can Benefit from the GAPS Diet?

The GAPS Diet is particularly beneficial for individuals with digestive disorders, such as IBS or chronic gut inflammation. It is also recommended for those with mental health conditions like autism, ADHD, and depression, as it addresses the gut-brain connection. Additionally, anyone seeking to improve overall gut health or manage autoimmune diseases may find the GAPS Diet advantageous. It is especially noted for its positive effects on children with autism and adults dealing with mental clarity issues.

Understanding the GAPS Diet Phases

2.1 Full GAPS Diet

  • Focus on meats, fish, and vegetables.
  • Incorporate fermented foods and broths.
  • Avoid processed and high-sugar foods.
  • Starts with bone broth and simple foods.
  • Gradually introduces vegetables and proteins.
  • Focuses on gut healing and digestion.

2.3 Transitioning Between Phases

Transitioning between GAPS Diet phases requires careful monitoring of digestive health and tolerance. Start with one GAPS meal daily, gradually increasing to two, then three, and finally incorporating snacks and beverages. Listen to your body, as the pace varies for everyone. If symptoms arise, slow down and reassess. Consulting a practitioner can help tailor the process. Patience is key to ensuring a smooth and sustainable transition to the Full GAPS Diet.

  • Begin with one GAPS meal daily.
  • Monitor symptoms and adjust pace.
  • Seek professional guidance if needed.

GAPS Diet Meal Plan Structure

A well-structured GAPS meal plan emphasizes balanced nutrition, starting with bone broth, meats, and vegetables, progressing to fermented foods and snacks as digestion improves.

3.1 Importance of Meal Planning

Meal planning is crucial for the GAPS Diet to ensure a smooth transition between phases and maintain nutrient-dense eating. It helps organize daily meals, preventing nutritional gaps and digestive setbacks. A structured plan supports the introduction of new foods gradually, reducing the risk of reactions. By focusing on bone broth, meats, and vegetables initially, the body heals more effectively. Planning also ensures variety, keeping meals engaging while adhering to dietary restrictions, which is essential for long-term success and gut health improvement.

3.2 Sample 5-Day Meal Plan

A sample 5-day GAPS meal plan starts with bone broth at breakfast, followed by GAPS-friendly dishes like meatballs or pancakes. Lunches feature soups or fish with vegetables, while dinners include stews or roasted meats. Snacks like avocado or fermented foods are included. This structured plan ensures a variety of nutrient-dense meals, aligning with the diet’s principles and supporting gut healing. It offers a clear guide for those transitioning into the Full GAPS Diet phase.

3.3 Sample 14-Day Meal Plan

A 14-day GAPS meal plan provides a detailed schedule, outlining breakfast, lunch, and dinner options. Each day includes nutrient-dense meals like roasted meats, fish, and vegetables. Bone broth is a staple at breakfast, while fermented foods like sauerkraut are incorporated. The plan ensures variety, with recipes like homemade pancakes and stews, all adhering to GAPS principles. This extended plan helps individuals transition smoothly, offering structure and diversity for sustained gut healing and overall well-being.

Foods to Eat on the GAPS Diet

The GAPS Diet emphasizes nutrient-dense foods like meats, fish, shellfish, and vegetables, both raw and cooked. Fermented foods and bone broth are also central to the plan.

4.1 Recommended Foods

Recommended foods on the GAPS Diet include grass-fed meats, wild-caught fish, shellfish, and organic vegetables. Fermented foods like sauerkraut and kimchi are encouraged for gut health. Bone broth and meat stock are staples, providing essential nutrients. Healthy fats such as avocado oil and olive oil are also emphasized. Nuts and seeds, like almond butter, are included in moderation. Fresh fruits like apples and bananas are allowed, particularly when ripe. Herbal teas and homemade soups further support the diet’s goals of healing and nourishment.

4.2 Foods to Avoid

The GAPS Diet excludes grains, starchy vegetables, sugars, and processed foods to minimize inflammation and support gut healing. Avoid high-carbohydrate foods, modern dairy products, soy, and artificial additives. Refined sugars, alcohol, and foods high in phytates are also prohibited. The focus is on eliminating toxins and irritants that could hinder digestive recovery, ensuring only nutrient-dense, easily digestible foods are consumed to promote optimal health and well-being.

4.3 Incorporating Fermented Foods

Fermented foods are central to the GAPS Diet, aiding gut health by introducing beneficial bacteria and improving digestion. Sauerkraut, kefir, kimchi, and fermented vegetables are recommended. These foods support gut healing, enhance nutrient absorption, and boost immunity. Start with small amounts to avoid digestive upset and gradually increase intake. Fermented foods are rich in probiotics and essential vitamins, making them a cornerstone of the GAPS Diet for overall well-being and gut restoration.

5.2 Foods Allowed in Each Stage

5.3 Tips for a Smooth Transition

Start with bone broth and meat stock to soothe the gut. Introduce new foods gradually, monitoring for reactions. Keep portions small and focus on easily digestible options. Stay hydrated with herbal teas and consider a GAPS milkshake for added nutrition. Prioritize rest and avoid stress during the transition. Listen to your body and slow down if symptoms arise. Patience and consistency are key to a successful progression through the stages.

GAPS Diet Recipes

The GAPS Diet offers a variety of nutrient-dense recipes, including bone broth, meat stock, GAPS milkshakes, and digestion-friendly dishes like pancakes and muffins made from allowed ingredients; These meals are designed to promote healing and support the diet’s principles, ensuring a balanced and flavorful approach to improving gut and overall health.

6.1 Breakfast Recipes

GAPS Diet breakfast recipes focus on nutrient-dense, gut-healing foods. Start with bone broth or a GAPS milkshake, followed by options like scrambled eggs, avocado, and fermented vegetables. Grain-free pancakes made from almond flour or zucchini are popular choices. Breakfast dishes often include meats, fish, or homemade soups to provide essential proteins and fats. These meals are designed to support digestion and energy while adhering to the diet’s principles, offering a delicious and nutritious start to the day.

6.2 Lunch and Dinner Recipes

GAPS Diet lunch and dinner recipes emphasize nutrient-dense, gut-friendly meals. Typical dishes include meats, fish, shellfish, and vegetables, either raw, cooked, or fermented. Salads with olive oil, avocado, and homemade dressings are popular. Soups and stews made with bone broth and seasonal vegetables are staples. Meals are balanced with proteins, vegetables, and healthy fats, ensuring both satisfaction and adherence to the diet’s healing principles, while promoting digestive health and overall well-being.

6.3 Snack Ideas

GAPS-friendly snacks include fermented vegetables, nuts (if tolerated), and homemade baked goods like pancakes or muffins. Fresh fruit, avocado, and vegetable sticks with dips like olive oil or homemade yogurt are also great options. Cold-pressed oils and herbal teas can accompany snacks for added nutrition. These snacks support gut healing while providing sustained energy and satisfaction between meals, aligning with the diet’s focus on nutrient-dense, easily digestible foods.

Benefits of the GAPS Diet

Popular GAPS-friendly snacks include fermented vegetables, fresh fruit, avocado slices, and vegetable sticks with dips like olive oil or homemade yogurt. Nuts, seeds, and homemade baked goods (like pancakes or muffins) are also great options. Cold-pressed oils and herbal teas can accompany snacks for added nutrition. These snacks are designed to support gut healing while providing sustained energy and satisfaction between meals.

7.1 Improved Digestive Health

The GAPS diet focuses on healing the gut lining, reducing inflammation, and restoring proper digestion. By eliminating harmful foods and incorporating nutrient-rich options like bone broth and fermented vegetables, individuals often experience reduced digestive discomfort, improved nutrient absorption, and enhanced overall gut health. This dietary approach aims to address digestive disorders and promote long-term well-being through targeted dietary interventions.

7.2 Enhanced Mental Clarity

The GAPS diet addresses the gut-brain connection, improving mental clarity and reducing symptoms of conditions like ADHD and autism. By eliminating toxins and promoting nutrient absorption, the diet supports brain health. Many followers report better focus, reduced brain fog, and enhanced cognitive function. This dietary approach helps restore mental well-being through targeted nutritional strategies.

7.3 Testimonials from GAPS Diet Followers

Many individuals have reported significant improvements in their health after following the GAPS Diet. Parents of children with autism and ADHD often share stories of reduced symptoms and improved behavior. Others mention enhanced digestion, increased energy levels, and mental clarity. These testimonials highlight the diet’s potential to transform lives by addressing gut health and its profound impact on overall well-being.

Implementing the GAPS Diet

Start with one GAPS meal daily, gradually increasing to full integration. Focus on consistency and patience, allowing the body to heal and adapt naturally.

8.1 Starting with One GAPS Meal a Day

Begin by incorporating one GAPS-compliant meal into your daily routine, such as a breakfast featuring meat stock or bone broth. This gradual approach helps the body adapt without overwhelming the digestive system. Start with simple recipes like scrambled eggs or fermented vegetables, ensuring each meal aligns with GAPS principles. As tolerance improves, slowly increase the number of GAPS meals, focusing on nutrient-dense foods and avoiding inflammatory triggers.

8.2 Gradually Incorporating More GAPS Meals

After starting with one GAPS meal, gradually add more meals, beginning with breakfast, then lunch, and eventually dinner. Listen to your body and adjust the pace, ensuring digestion remains comfortable. Incorporate snacks and beverages, focusing on nutrient-dense options like meat stocks, fermented foods, and fresh vegetables. This approach allows the gut to heal while reducing potential detox symptoms, promoting a smoother transition into the full GAPS protocol.

8.4 Managing Challenges and Setbacks

Challenges on the GAPS Diet may include digestive discomfort or detox symptoms. To manage these, introduce new foods slowly and listen to your body. Stay hydrated with bone broth and incorporate fermented foods gradually. If setbacks occur, revisit earlier stages of the diet or consult a healthcare professional for guidance. Patience and consistency are key to overcoming difficulties and achieving long-term benefits from the GAPS protocol.

Resources for the GAPS Diet

Key resources include Dr. Natasha Campbell-McBride’s book, online communities, and meal plan guides. Websites like GAPSinfo.com offer detailed support, recipes, and tools for success.

9.1 Recommended Reading Materials

9.2 Online Communities and Support Groups

Joining online communities like the GAPS Diet Support Group on Facebook or forums provides valuable connections and advice. Websites such as GAPSInfo.com offer resources, meal plans, and expert guidance. These platforms allow individuals to share experiences, ask questions, and access recipes. They also serve as motivation, helping users stay committed to the diet. Engaging with these communities can offer emotional support and practical tips for navigating the GAPS journey successfully.

9.3 GAPS Diet Apps and Tools

Several apps and tools are available to support the GAPS Diet, such as meal planners and recipe organizers. Apps like GAPS Diet Guide and MealPlan offer customizable meal plans, recipes, and shopping lists. These tools help users track progress, manage food intolerances, and stay organized. They also provide access to GAPS-friendly recipes and tips, making it easier to adhere to the diet. Utilizing these resources can simplify the journey and ensure long-term success.

ortho vision user manual pdf

Welcome to the Ortho Vision User Manual. This guide provides detailed instructions for installing, operating, and troubleshooting the Ortho Vision system, ensuring optimal performance and compliance.

1.1 Purpose of the Manual

This manual is designed to guide users in the effective operation, installation, and maintenance of the Ortho Vision system. It provides detailed instructions for troubleshooting common issues, ensuring compliance with safety standards, and optimizing system performance. The document is intended for both new and experienced users, offering a comprehensive resource to maximize the functionality of the Ortho Vision analyzer. Key topics include system setup, routine maintenance, and advanced operational features. By following this manual, users can ensure consistent and accurate results while adhering to regulatory requirements.

  • Installation and setup guidance.
  • Operational procedures and troubleshooting.
  • Maintenance and safety protocols.

1.2 Scope of the Document

This document provides a comprehensive guide for the Ortho Vision system, covering installation, operation, and maintenance. It includes detailed instructions for troubleshooting common issues, ensuring compliance with safety standards, and optimizing system performance. The manual is structured to address the needs of both new and experienced users, offering step-by-step procedures for setup, routine maintenance, and advanced operational features. Key topics encompass system configuration, data management, and regulatory compliance. The scope excludes detailed technical specifications, which are covered in separate appendices. This manual ensures users can operate the Ortho Vision analyzer efficiently and safely, adhering to all relevant guidelines and standards.

  • Installation and initial setup instructions.
  • Operational procedures and best practices.
  • Maintenance and troubleshooting guidelines.

1.3 Intended Audience

This manual is designed for healthcare professionals, laboratory technicians, and system administrators responsible for operating and maintaining the Ortho Vision analyzer. It is intended to assist new users in understanding the system’s functionality while providing advanced users with detailed operational insights. The guide is also useful for training purposes, ensuring compliance with safety protocols and regulatory standards. Key audience includes laboratory staff, biomedical engineers, and quality assurance personnel involved in immunohematology testing.

  • Laboratory technicians and technologists.
  • System administrators and maintenance personnel.
  • Quality assurance and compliance officers.
  • Healthcare professionals requiring detailed system understanding.

System Overview

The Ortho Vision system automates immunohematology testing, offering advanced processing capabilities, dynamic workflow management, and seamless integration with laboratory information systems for efficient and accurate results.

2.1 Hardware Components

The Ortho Vision system comprises a robust hardware setup designed for high-throughput immunohematology testing. Key components include a centralized processing unit, automated liquid pipetting system, reagent handling module, and a high-speed centrifuge. The system also features an integrated touchscreen display for user interaction and real-time monitoring. Additional hardware includes ID-MTS Gel Card readers, sample trays, and waste management units. The analyzer is compatible with USB and Ethernet connectivity for seamless integration with laboratory information systems. The hardware is built to ensure precision, reliability, and continuous operation, with modular design allowing for easy maintenance and upgrades. This setup supports advanced automation, enabling efficient processing of multiple samples simultaneously while maintaining data integrity and security.

2.2 Software Features

The Ortho Vision system is powered by advanced software designed for seamless operation and data management. Key features include dynamic workflow management, enabling continuous sample processing with minimal user intervention. The software supports ID-MTS Gel Card technology for precise test interpretation and automated reaction grading. It also offers real-time monitoring of system status, reagent levels, and sample processing. Integration with laboratory information systems (LIS) and Ortho CONNECT enhances data sharing and workflow efficiency. The software includes advanced security protocols, such as role-based access control, to ensure data integrity and compliance with regulatory standards. Regular updates and remote support capabilities further ensure optimal performance and adaptability to evolving laboratory needs. These features collectively provide a robust, user-friendly platform for high-volume immunohematology testing.

2.3 Compatibility and Interoperability

The Ortho Vision system is designed to integrate seamlessly with various laboratory information systems (LIS) and external devices. Its compatibility with ID-MTS Gel Cards ensures accurate and efficient test processing. The system supports multiple data formats, including DICOM, for streamlined communication with other medical devices. Ortho Vision is also fully compatible with Ortho CONNECT, enhancing workflow optimization and resource management across laboratories. Additionally, it integrates with third-party software solutions, allowing for comprehensive data management and analysis. This interoperability ensures that Ortho Vision can operate effectively within diverse laboratory settings, maintaining high performance and connectivity. Regular software updates further enhance compatibility, ensuring the system adapts to emerging technologies and integrates effortlessly with new tools and platforms.

Installation and Setup

Ensure proper power supply and network connections before installation. Follow the step-by-step guide for unpacking, placing, and connecting the analyzer. Use Ortho CONNECT for initial setup.

3.1 Pre-Installation Requirements

Before installing the Ortho Vision system, ensure the following requirements are met: a stable power supply, compatible network infrastructure, and adequate laboratory space. The system requires a dedicated power line with a three-prong outlet to ensure proper grounding and safety. Verify that the environment meets temperature and humidity specifications (18-25°C and 50-70% RH) to maintain optimal performance. Ensure all necessary documentation, including user manuals and safety guidelines, are reviewed and understood. Additionally, confirm that personnel have received appropriate training to handle the system and its components safely and effectively. Proper preparation ensures a smooth installation process and minimizes potential issues during operation.

3.2 Installation Steps

Begin by unpacking the Ortho Vision system and positioning it on a stable, level surface. Connect the power cord to a dedicated electrical outlet and link all necessary peripheral devices. Install the software by following the on-screen prompts, ensuring it integrates with your existing systems. After installation, perform a power-on self-test to confirm all components are operational. Conduct a calibration process as outlined in the manual to ensure accuracy. Finally, review and configure system settings to meet your laboratory’s specific requirements. Consult the user manual for detailed guidance and troubleshooting to ensure a successful setup, which is essential for reliable operation and data integrity.

3.3 Initial Configuration

After installation, proceed with the initial configuration of the Ortho Vision system; Begin by setting up user accounts and defining access levels for authorized personnel. Next, configure network settings to ensure connectivity with your laboratory information system (LIS) and other devices. Define data management preferences, including backup schedules and storage locations. Calibrate the system according to the manufacturer’s guidelines to ensure accurate test results. Set up quality control parameters and review default settings for test protocols. Finally, integrate any additional software or plugins required for advanced functionalities. Consult the user manual for step-by-step instructions to complete the configuration successfully and ensure system readiness for operation.

Operation

The Ortho Vision system automates test processing, ensuring precise and efficient workflows. Follow step-by-step procedures for sample analysis, data interpretation, and system monitoring to achieve accurate results.

4.1 Basic Operating Procedures

To begin operation, power on the Ortho Vision system and ensure all components are initialized. Load samples onto the analyzer, following the recommended pipetting techniques. Initialize the test cycle through the touchscreen interface or connected LIS. Monitor the progress via the real-time display. Upon completion, review the data and interpret results according to predefined parameters. Regularly clean and maintain the system as outlined in the manual to ensure accuracy and longevity. Always refer to the user manual for detailed troubleshooting and optimization strategies. Proper adherence to these procedures guarantees reliable and precise test outcomes, aligning with regulatory standards and operational efficiency.

4.2 Advanced Functionalities

The Ortho Vision system offers advanced features for enhanced productivity and accuracy. Utilize automated liquid pipetting and reagent handling for streamlined workflows. The system supports dynamic workflow management, enabling continuous sample loading and real-time data analysis. Leverage responsive automation for faster processing and improved efficiency. Advanced data management tools allow seamless integration with laboratory information systems (LIS) and ORTHO CONNECT, ensuring comprehensive workflow optimization. The system also provides enhanced data security and user-access controls for compliance with regulatory standards. These advanced functionalities simplify complex tasks, reduce manual intervention, and ensure reliable results. Regular updates and customizable settings further enhance the system’s adaptability to evolving laboratory needs, making it a robust solution for modern diagnostics.

4.3 Data Management and Analysis

The Ortho Vision system provides robust data management and analysis tools, enabling efficient and accurate results interpretation. Utilize advanced software features for automated data processing, storage, and retrieval. The system integrates seamlessly with laboratory information systems (LIS) and ORTHO CONNECT, ensuring centralized data control. Enhanced data analysis capabilities include customizable reporting and trending tools for comprehensive insights. Secure data management ensures compliance with regulatory standards, maintaining patient confidentiality and data integrity. The system also supports ID-MTS Gel Card processing and digital image analysis for precise test results. With user-friendly interfaces and real-time data accessibility, Ortho Vision streamlines laboratory workflows, enhancing decision-making and operational efficiency while ensuring reliable and traceable outcomes.

Maintenance and Troubleshooting

Perform routine maintenance tasks to ensure optimal system performance. Refer to diagnostic tools for troubleshooting common issues, following detailed guidelines for fault resolution and compliance.

5.1 Routine Maintenance Tasks

Regular maintenance ensures the optimal performance and longevity of the Ortho Vision system. Clean the instrument according to the manufacturer’s guidelines, paying attention to fluidic paths, sensors, and optical components. Check and replace worn-out parts promptly to avoid downtime. Lubricate moving components as specified to maintain smooth operation. Verify that all system settings, including temperature and humidity controls, are within recommended ranges. Perform software updates to ensure compatibility and functionality. Schedule periodic recalibrations to maintain accuracy. Always adhere to safety protocols during maintenance procedures. Refer to the user manual for detailed step-by-step instructions and recommended maintenance schedules. Proper upkeep ensures reliable results and compliance with regulatory standards. Keep a maintenance log for documentation purposes.

5.2 Common Issues and Solutions

The Ortho Vision system may occasionally encounter issues that can be resolved with troubleshooting. Common problems include error messages, incorrect test results, or system freezes. If an error message appears, refer to the user manual for specific solutions. For inaccurate results, ensure reagents and samples are within expiration dates and properly stored. Clean sensors and optical components regularly to maintain accuracy. If the system freezes, restart it and check for software updates. Calibrate the instrument as instructed to resolve performance issues. Always follow safety guidelines when troubleshooting. For unresolved issues, contact Ortho Clinical Diagnostics support for assistance. Proper troubleshooting ensures reliable operation and accurate outcomes.

5.3 Diagnostic Tools and Techniques

The Ortho Vision system provides advanced diagnostic tools to identify and resolve issues efficiently. Utilize the built-in diagnostic software to run system checks and generate detailed reports. System logs and error codes help pinpoint specific problems, guiding troubleshooting efforts. Regular calibration ensures accurate test results, while automated alerts notify users of potential issues. For complex problems, diagnostic kits and troubleshooting guides are available. Perform routine maintenance tasks, such as cleaning sensors and updating software, to prevent errors. Consult the user manual for step-by-step instructions on using diagnostic tools effectively. These features ensure optimal performance and minimize downtime, enabling reliable operation of the Ortho Vision analyzer in clinical settings.

Safety Information

Read this manual carefully and understand all safety guidelines before operating the Ortho Vision system. Follow proper handling procedures for biohazardous materials and electrical components. Wear protective gear, ensure a safe working environment, and adhere to maintenance schedules. Always follow safety protocols to ensure safe operation.

6.1 Safety Precautions

Adhering to safety precautions is essential when operating the Ortho Vision system. Always wear protective gear, including gloves and lab coats, when handling biohazardous materials or reagents. Ensure the workspace is well-ventilated and free from flammable materials. Avoid direct contact with electrical components to prevent shock. Regularly inspect equipment for damage or wear and follow the manufacturer’s guidelines for maintenance. Keep emergency contact information readily available, and ensure all users are trained on proper operating procedures. Familiarize yourself with emergency shutdown protocols and fire extinguisher locations. Never bypass safety features or ignore alarm signals, as this could lead to system damage or personal injury. Proper adherence to these precautions ensures safe and efficient operation of the Ortho Vision system.

6.2 Emergency Procedures

In case of emergencies, follow these procedures to ensure safety and minimize damage. For power failures, immediately stop all operations and wait for backup power to activate. If a chemical spill occurs, evacuate the area, wear protective gear, and follow spill containment protocols. In case of equipment malfunction, press the emergency shutdown button and contact technical support. For fire emergencies, activate the fire alarm, evacuate the premises, and use fire extinguishers rated for electrical fires. Never attempt to repair damaged equipment without proper training. Keep emergency contact numbers accessible, and ensure all personnel are trained in these procedures. Regular drills and reviews of emergency protocols are recommended to maintain preparedness. Always prioritize safety and follow established guidelines to handle emergencies effectively.

Regulatory Compliance

This section outlines the regulatory approvals and certifications for the Ortho Vision system, including FDA clearance, CE marking, and compliance with international medical device standards.

7.1 FDA Approvals and Certifications

The Ortho Vision system has received FDA clearance, ensuring compliance with rigorous safety and performance standards. It is certified for use in clinical settings and adheres to FDA regulations for medical devices. The system meets all requirements for accuracy, reliability, and patient safety, as outlined in FDA guidelines. Specific models, such as the Ortho Vision Swift, have been approved under FDA PMA P010062, confirming their suitability for diagnostic purposes. Users are advised to consult the official user manual for detailed information on FDA certifications and compliance. This ensures proper utilization and adherence to regulatory standards.

7.2 CE Marking and International Standards

The Ortho Vision system is CE marked, indicating compliance with EU directives for medical devices. This certification ensures the product meets essential safety and performance requirements. The system also adheres to international standards such as ISO, guaranteeing quality and reliability. CE marking allows the Ortho Vision to be marketed within the European Economic Area. Additionally, the product complies with other global regulations, ensuring its suitability for international use. Users are encouraged to review the user manual for detailed information on CE marking and international certifications. This ensures proper compliance with regional and global standards, maintaining the highest level of safety and performance.

Ortho CONNECT

Ortho CONNECT enhances integration and workflow efficiency across laboratory networks, ensuring seamless data management and optimal resource utilization with the Ortho Vision system.

8.1 Integration Capabilities

Ortho CONNECT offers robust integration capabilities, enabling seamless connectivity with laboratory information systems (LIS) and other healthcare platforms. It supports standard data exchange protocols, such as HL7, ensuring efficient communication between systems. The platform is designed to integrate with the Ortho Vision analyzer, allowing for real-time data sharing and streamlined workflows. This capability enhances laboratory efficiency by reducing manual data entry and improving overall system interoperability. Additionally, Ortho CONNECT supports integration with multiple analyzers and systems, making it a versatile solution for laboratories of all sizes. Its scalable architecture ensures that it can adapt to growing laboratory needs, providing a future-proof integration solution.

8.2 Workflow Optimization

Ortho Vision systems are designed to optimize laboratory workflows through advanced automation and streamlined processes. The Ortho Vision analyzer integrates seamlessly with Ortho CONNECT, enabling real-time data management and reducing manual intervention. Automated features such as liquid pipetting, reagent handling, and continuous access ensure uninterrupted test processing. Dynamic workflow management allows laboratories to prioritize tasks and allocate resources efficiently. The system’s load-on-the-fly capability minimizes downtime, while its compatibility with ID-MTS Gel Cards and digital image processing enhances accuracy and speed. These features collectively improve laboratory productivity, enabling faster turnaround times and better resource utilization. Ortho Vision’s workflow optimization tools are tailored to meet the demands of modern laboratories, ensuring efficient and reliable operations.

Ortho Workstation

The Ortho Workstation integrates seamlessly with Ortho Vision systems, providing advanced data management and analysis capabilities to enhance laboratory workflow efficiency and operational performance.

9.1 Features and Functionalities

The Ortho Workstation offers advanced features such as automated data analysis, customizable reporting, and real-time monitoring. It integrates with Ortho Vision systems, enabling efficient workflow management. The workstation supports high-volume testing and provides secure data storage. Its user-friendly interface ensures ease of operation, while advanced algorithms enhance accuracy in test results. Additionally, the Ortho Workstation supports compliance with regulatory standards, ensuring reliable and consistent performance. These features make it an essential tool for laboratories aiming to optimize their operations and deliver precise results efficiently.

9.2 Benefits and Advantages

The Ortho Workstation provides numerous benefits, including enhanced efficiency, improved accuracy, and streamlined workflow management. Its advanced automation capabilities reduce manual intervention, minimizing errors and saving time. The system’s compatibility with Ortho Vision analyzers ensures seamless integration, enabling laboratories to process high volumes of tests efficiently. Additionally, its robust data security features protect sensitive information, maintaining compliance with regulatory requirements. The user-friendly interface and customizable reporting options further enhance its utility, making it a valuable asset for laboratories seeking to optimize their operations and deliver reliable results.

Appendices

This section provides additional resources, including technical specifications, glossary of terms, and troubleshooting guides, to support comprehensive understanding and effective use of the Ortho Vision system.

10.1 Technical Specifications

The Ortho Vision system is designed to meet high standards of performance and reliability. Key specifications include a weight of 330 kg for the analyzer and 114 kg for the workstation. The power requirement is a dedicated single-phase supply with a three-core cable. The system operates on compatible software, ensuring seamless integration with laboratory information systems (LIS). It supports advanced automation features like liquid pipetting, reagent handling, and data management. The Ortho Vision analyzer is built for continuous access, enabling on-the-fly loading for efficient workflow. Technical details, including dimensions and electrical requirements, are provided for proper installation and maintenance. These specifications ensure optimal functionality and compliance with regulatory standards.

10.2 Glossary of Terms

  • Liquid Pipetting: Automated handling of fluids for precise test processing.
  • Reagent Handling: Systematic management of chemicals for accurate reactions.
  • Centrifugation: High-speed spinning to separate substances for analysis.
  • Data Management: Organization and storage of test results for easy access.
  • Gel Cards: ID-MTS technology for efficient blood typing and antibody detection.
  • Intellicheck: Quality control feature ensuring accurate test results.
  • Dynamic Workflow Management: Real-time monitoring of test processing.
  • Continuous Access: Ability to load tests without stopping the system.

This glossary provides definitions for key terms used in the Ortho Vision system, helping users understand technical aspects and improve operational efficiency.

thick it instructions

Thick-It is a popular food and beverage thickener designed to help individuals with dysphagia or swallowing disorders․ It is easy to use and comes in various forms, including ready-to-drink options․ Proper mixing and usage ensure safe and effective thickening of liquids to desired consistencies, improving swallowing safety and nutrition intake․ Always follow the product’s guidelines and consult healthcare professionals for personalized advice․

Overview of Thick-It Products

Thick-It offers a range of products designed to thicken foods and beverages for individuals with dysphagia or swallowing difficulties․ The original Thick-It powder is a popular choice, while Thick-It 2 provides a concentrated formula, requiring less product for the same consistency․ Ready-to-drink options are also available, offering convenience for hot, cold, or frozen beverages․ These products are flavor-neutral and easy to integrate into daily meals, ensuring nutritional intake without altering the taste or appearance of liquids․ They cater to various needs, providing safe and effective solutions for swallowing challenges, with clear usage guidelines for optimal results․

Importance of Proper Usage

Proper usage of Thick-It products is crucial for safety and effectiveness, especially for individuals with dysphagia or swallowing disorders․ Incorrect mixing can lead to inconsistent textures, posing choking hazards or failing to meet nutritional needs․ Following the guidelines ensures liquids reach the correct consistency, reducing the risk of aspiration and improving swallowing safety․ It also prevents issues like clumping or over-thickening, which can make liquids difficult to consume․ Proper usage maintains the product’s effectiveness and ensures it serves its intended purpose of enhancing swallowing safety and dietary comfort for users, particularly infants, children, and those with medical conditions requiring thickened liquids․

Understanding Thick-It and Thick-It 2

Thick-It and Thick-It 2 are both designed for thickening liquids but differ in concentration․ Thick-It 2 is more concentrated, requiring 50% less to achieve the same consistency․ Always use under medical guidance for safe and effective results․

Differences Between Thick-It and Thick-It 2

Thick-It and Thick-It 2 are both popular thickeners but differ in concentration and usage․ Thick-It 2 is more concentrated, requiring about 50% less product to achieve the same consistency as the original․ For example, achieving nectar consistency in 4 ounces of liquid requires 2 tablespoons of Thick-It and only 1 tablespoon of Thick-It 2․ This makes Thick-It 2 more convenient for those who need stronger thickening with less volume․ Both products are safe for hot and cold beverages but should be used under medical supervision, especially for children and infants․

Concentration Levels Explained

Concentration levels for Thick-It products are crucial for achieving the right consistency in liquids․ Thick-It 2, being more concentrated, requires less product to reach the desired thickness compared to the original․ For instance, nectar consistency in 4 ounces of liquid needs 2 tablespoons of Thick-It and only 1 tablespoon of Thick-It 2․ Proper measurement ensures safety and effectiveness, especially for individuals with swallowing disorders․ Always follow the recommended guidelines to avoid over- or under-thickening, which can compromise safety․ Consulting a healthcare professional is advised to determine the appropriate concentration level for individual needs․

Safety Guidelines for Thick-It Use

Ensure safe usage by following proper preparation and storage․ Sanitize utensils and surfaces before mixing․ Avoid using Thick-It for infants under 2 without medical advice․ Always refrigerate opened products and use within 14 days․ Follow the recommended amounts to prevent over-thickening, which can pose choking risks․ Regularly consult healthcare professionals for personalized guidance․

Precautions for Infants and Children

Thick-It Original should not be used for infants under 2 years old․ For children under 12, consult a physician before use․ Always sanitize measuring tools and surfaces to prevent contamination․ When preparing for children, follow the recommended amounts carefully to avoid over-thickening, which can lead to choking hazards․ Parents or caregivers should closely monitor the child while they consume thickened liquids to ensure safe swallowing․ Never substitute Thick-It for medical advice; always adhere to guidelines set by healthcare professionals for the child’s specific needs․

Sanitation and Hygiene Practices

Proper sanitation is essential when using Thick-It products․ Always wash your hands before preparing thickened liquids․ Ensure all utensils, such as measuring scoops and spoons, are thoroughly cleaned and sanitized after each use․ Use a clean, dry surface for mixing to prevent contamination․ For ready-to-drink options, store them in a cool, dry place before opening and refrigerate after opening․ Discard any unused thickened liquid if not consumed within the recommended time frame․ Regularly sanitize any equipment used in the preparation process to maintain hygiene standards and prevent bacterial growth․

Mixing Instructions for Thick-It

Pour 4 ounces of liquid into a glass, add the recommended amount of Thick-It, and stir thoroughly․ Adjust the quantity based on desired consistency, following the product label instructions․

Step-by-Step Preparation Guide

Start by measuring 4 ounces of your desired liquid into a clean glass․ Gradually add the recommended amount of Thick-It, stirring continuously with a fork or whisk to ensure even distribution․ Continue stirring until the thickener is fully dissolved and the liquid reaches the desired consistency․ For precise measurements, refer to the product label or usage chart․ Allow the mixture to sit for a few seconds before serving to achieve the optimal texture․ Adjust as needed based on individual preferences or medical guidelines․ Always consult a healthcare professional for personalized instructions․

Measuring the Right Amount

Accurate measurement is crucial for achieving the correct consistency․ For 4 ounces of liquid, use 2 tablespoons of Original Thick-It or 1 tablespoon of Thick-It 2 for nectar consistency․ Refer to the product’s usage chart for specific guidelines․ Use a measuring scoop or spoon to ensure precision․ The amount may vary based on the desired consistency (nectar, honey, or pudding) and the type of liquid․ Always measure carefully to avoid over- or under-thickening․ Consult a healthcare professional for personalized recommendations, especially for children or infants․ Proper measurement ensures safety and effectiveness in thickening liquids for swallowing disorders․

Stirring Techniques for Optimal Consistency

Proper stirring is essential for achieving the desired texture․ Use a fork or whisk to mix Thick-It into liquids, stirring briskly as you add the thickener․ This ensures even distribution and prevents clumping․ For best results, continue stirring for about 30 seconds to 1 minute after adding the thickener․ Avoid over-stirring, as it may create excessive foam or alter the consistency․ Ensure the mixture is smooth and free of lumps before serving․ Proper stirring techniques help maintain the safety and effectiveness of thickened liquids for individuals with swallowing difficulties․

Consistency Levels for Thickened Liquids

Thickened liquids are categorized into three main consistency levels: nectar, honey, and pudding․ Each level addresses specific swallowing needs, ensuring safe and effective nutrition for individuals with dysphagia․

Nectar-Consistency Liquids

Nectar-consistency liquids are slightly thickened, resembling thin syrup․ They coat the spoon but still flow easily when tilted․ This level is often recommended for mild dysphagia, as it reduces the risk of aspiration while maintaining ease of swallowing․ To achieve nectar consistency, use 1-2 tablespoons of Thick-It per 4 ounces of liquid, depending on the product type․ Stir thoroughly to ensure even distribution․ Always consult a healthcare professional to determine the appropriate consistency for individual needs․ Proper preparation ensures safety and effectiveness in managing swallowing difficulties․

Honey-Consistency Liquids

Honey-consistency liquids are thicker and more viscous than nectar-consistency liquids, resembling the flow of honey․ They are recommended for moderate dysphagia, as they provide a safer swallowing experience by reducing aspiration risks․ To achieve this consistency, typically 3-4 tablespoons of Thick-It or 1․5-2 tablespoons of Thick-It 2 are added per 4 ounces of liquid․ Stir thoroughly to ensure even thickness․ This level is ideal for individuals who require more resistance in their liquids but still need a manageable flow․ Always follow the product’s guidelines and consult a healthcare professional for personalized recommendations․

Pudding-Consistency Liquids

Pudding-consistency liquids are the thickest option, designed for severe dysphagia․ They have a spoon-thick texture, similar to pudding, and are used when liquids need to be nearly solid to prevent aspiration․ Achieving this consistency typically requires 4-5 tablespoons of Thick-It or 2-2․5 tablespoons of Thick-It 2 per 4 ounces of liquid․ Stir thoroughly to avoid lumps․ This level is ideal for individuals with significant swallowing difficulties, as it minimizes the risk of choking․ Always consult a healthcare professional to determine the appropriate consistency for individual needs, ensuring safe and effective nutrition intake․

Using Thick-It with Different Beverages

Thick-It works seamlessly with hot and cold beverages, including coffee, tea, and fruit juices․ Its neutral taste ensures flavors remain unchanged, making it versatile for various drinks․

Hot and Cold Beverage Compatibility

Thick-It is compatible with both hot and cold beverages, making it versatile for various uses․ For hot drinks like coffee or tea, mix the thickener gradually while stirring to achieve the desired consistency․ For cold beverages, such as juices or water, the same method applies, ensuring even distribution․ The product does not alter the taste or appearance of the drink, providing a seamless experience․ Whether it’s a steaming cup of coffee or a chilled glass of juice, Thick-It adapts effortlessly, maintaining the integrity of the beverage while enhancing safety for those with swallowing difficulties․

Ready-to-Drink Thick-It Options

Ready-to-drink Thick-It beverages offer convenience for individuals needing thickened liquids․ Available in single-serve and multiple-serve bottles, these products come in various flavors and are pre-thickened to the correct consistency․ They can be consumed hot, cold, or even frozen into popsicles for a refreshing treat․ After opening, refrigerate the beverages and use within 14 days․ This option eliminates the need for measuring and mixing, providing a hassle-free solution for those with dysphagia or swallowing challenges․ Ready-to-drink Thick-It products ensure consistency and safety while maintaining great taste and nutritional value․

Storage and Shelf Life

Store Thick-It products in a cool, dry place to maintain quality and shelf life․ Unopened products typically have a long shelf life, while opened items require refrigeration․ Ready-to-drink options should be refrigerated after opening and used within 14 days․ Always check expiration dates and ensure proper sealing to prevent contamination․ Following these guidelines ensures the product remains effective and safe for use, providing consistent thickening results for individuals with swallowing difficulties․ Proper storage is essential to preserve the product’s texture and functionality over time․

Proper Storage Conditions

To maintain the quality and effectiveness of Thick-It products, store them in a cool, dry place away from direct sunlight and heat sources․ Avoid exposing the products to moisture or humidity, as this can affect their texture and performance․ For ready-to-drink options, refrigerate after opening and use within 14 days․ Ensure the container is tightly sealed to prevent contamination․ Keep the products out of reach of children and pets․ Always check the expiration date on the packaging before use․ Proper storage conditions help preserve the product’s functionality and ensure safe, consistent results when thickening liquids․

Refrigeration and Usage Guidelines

After opening, Thick-It ready-to-drink beverages should be refrigerated and consumed within 14 days․ They can be served hot, cold, or even frozen into ice cubes or pops for convenience․ For the original Thick-It powder, store it in a cool, dry place until use․ Once mixed, any leftover thickened liquid should be refrigerated and used within 24 hours․ Ensure the product is not exposed to moisture or heat sources, as this can alter its effectiveness․ Always check the expiration date on the packaging before use and follow the recommended usage guidelines for optimal results and safety․

Troubleshooting Common Issues

Common issues include clumping or over-thickening․ Adjust consistency by adding small amounts of liquid or thickener gradually․ Stir thoroughly to achieve the desired texture smoothly․

Adjusting Consistency Levels

Adjusting consistency levels with Thick-It requires careful measurement and gradual modifications․ Start by following the recommended dosage on the product label․ If the liquid is too thin, add a small amount of Thick-It and stir thoroughly․ Conversely, if it’s too thick, gradually add a little more liquid until the desired consistency is achieved․ Always stir briskly to ensure even distribution․ For precise adjustments, use a whisk or fork to mix, and test the consistency by dripping the liquid from a spoon․ This method ensures safety and effectiveness for individuals with swallowing difficulties․

Resolving Clumping or Over-Thickening

If clumping or over-thickening occurs, start by adding a small amount of liquid to the mixture and stir gently until smooth․ Avoid over-stirring, as it can introduce air or worsen clumping․ For severe clumping, dissolve the thickener in a small amount of warm water before mixing it into the liquid․ Ensure the thickener is added gradually and stirred continuously to prevent uneven distribution․ If the mixture becomes too thick, slowly add more liquid, testing consistency regularly․ Always use the recommended measuring scoop and follow the usage chart to avoid over-thickening․ Proper adjustment ensures a safe and consistent texture for swallowing safety․

Benefits of Using Thick-It

Thick-It improves swallowing safety, reduces aspiration risks, and enhances nutrition intake for individuals with dysphagia․ It is easy to integrate into meals, offering convenience and peace of mind․

Improves Swallowing Safety

Thick-It enhances swallowing safety by thickening liquids to a consistency that reduces the risk of aspiration․ This is especially crucial for individuals with dysphagia, as it prevents choking and ensures safe passage of food and liquids through the throat․ The product’s ability to customize thickness levels allows for tailored solutions, meeting specific needs․ By improving control during swallowing, Thick-It helps individuals maintain nutrition and hydration without compromising safety, making it a vital tool for managing swallowing disorders effectively and confidently․

Easy Integration into Daily Meals

Thick-It seamlessly integrates into daily meals, offering convenience and versatility for individuals with swallowing challenges․ Its ready-to-drink options, available in single-serve bottles, provide ease of use and portability․ These beverages can be served hot, cold, or even frozen, catering to diverse preferences․ Additionally, Thick-It can be mixed into pureed foods or added to hot or cold liquids without altering their taste or appearance․ This adaptability ensures that nutrition and hydration remain accessible and enjoyable, making it simple to incorporate into daily routines without compromising on variety or flavor․

Understanding Viscosity in Liquids

Viscosity measures a fluid’s resistance to flow, with dynamic viscosity defined by shear stress and shear rate․ Thick-It adjusts liquid thickness for safer swallowing without altering taste․

Dynamic Viscosity Explained

Dynamic viscosity (µ) measures a fluid’s resistance to flow under stress․ It is defined as the ratio of shear stress to shear rate․ In liquids, higher viscosity means thicker, slower flow․ Thick-It works by increasing the viscosity of liquids, making them safer for swallowing․ The formula µ = shear stress / shear rate helps quantify this property․ Understanding viscosity is crucial for achieving the right consistency when thickening beverages or foods, ensuring they meet individual swallowing needs․ This concept is key to using Thick-It effectively for dysphagia management, as viscosity levels determine nectar, honey, or pudding consistencies․

Shear Rate and Stress in Fluid Dynamics

Shear rate measures the rate of deformation in a fluid, while shear stress is the force applied to cause this deformation․ In fluid dynamics, shear stress is calculated as shear rate multiplied by dynamic viscosity (µ)․ When using Thick-It, the product increases the liquid’s viscosity, altering its shear properties․ Higher viscosity fluids exhibit greater resistance to flow, which is crucial for achieving safe swallowing consistencies․ Understanding shear rate and stress helps in determining the optimal amount of Thick-It needed to thicken liquids effectively, ensuring they meet specific dysphagia requirements for nectar, honey, or pudding consistencies․

Consulting Healthcare Professionals

Consulting healthcare professionals, such as speech therapists, is essential for safe Thick-It usage․ They assess individual needs and recommend appropriate consistency levels, ensuring effective swallowing safety and proper nutrition․

Role of Speech and Language Therapists

Speech and language therapists play a crucial role in guiding the use of Thick-It products․ They assess individuals with swallowing disorders to determine the appropriate consistency level for safe consumption․ Therapists provide personalized recommendations, ensuring the correct amount of Thick-It is used to achieve nectar, honey, or pudding consistency․ They also demonstrate proper mixing techniques and monitor progress to adjust thickness levels as needed․ Their expertise ensures that individuals can safely enjoy foods and beverages while maintaining proper nutrition and swallowing safety․

Medical Guidance for Safe Usage

Medical professionals play a vital role in ensuring the safe use of Thick-It products․ They assess individual needs and provide tailored recommendations for consistency levels based on swallowing abilities․ Before using Thick-It, especially for infants or children, consulting a healthcare provider is essential․ They will guide proper usage to avoid choking hazards and ensure nutritional needs are met․ Always follow the recommended dosage and preparation methods to achieve the desired consistency safely․ Regular monitoring by a healthcare provider can help adjust usage as needed, ensuring optimal swallowing safety and overall health outcomes for individuals with dysphagia or other swallowing disorders․

Resources and Support

Thick-It provides detailed usage charts, FAQs, and customer support for guidance․ Visit the official website for resources, ensuring safe and effective use of Thick-It products․

Usage Charts and Reference Guides

Thick-It provides detailed usage charts to help determine the correct amount of thickener needed for desired consistency levels․ These guides, often found on product packaging or the official website, outline measurements for various liquids and consistencies, such as nectar, honey, and pudding thickness․ Reference guides also include troubleshooting tips to prevent over-thickening or clumping․ By following these charts, users can achieve the right texture for safe swallowing․ Always consult the specific product’s guide for accurate measurements, ensuring optimal results and adherence to safety guidelines․

Frequently Asked Questions

What is the difference between Thick-It and Thick-It 2? Thick-It 2 is concentrated, requiring about half the amount for the same consistency․ How do I store Thick-It products? Store them in a cool, dry place, and refrigerate ready-to-drink options after opening․ Can I use Thick-It with hot beverages? Yes, it works with both hot and cold liquids․ How do I know the right consistency? Consult your healthcare provider or use the provided usage charts․ What if the liquid becomes too thick? Gradually add a small amount of liquid to adjust․ Always follow the instructions carefully for best results․

Thick-It offers a safe and effective solution for thickening liquids, improving swallowing safety and nutrition intake․ Always follow guidelines and consult professionals for personalized advice․

Proper use of Thick-It ensures safe swallowing and nutrition for individuals with dysphagia․ Always follow mixing instructions and measure accurately for desired consistencies․ Nectar, honey, and pudding levels cater to specific needs․ Consult healthcare professionals for personalized advice, especially for infants and children․ Store products in cool, dry places and refrigerate ready-to-drink options after opening․ Regular sanitation and hygiene practices are essential․ Adjustments may be needed for optimal results, and troubleshooting tips can resolve issues like clumping․ Thick-It enhances swallowing safety and easily integrates into daily meals, offering convenience and reliability․

Final Thoughts on Thick-It Usage

Thick-It is a reliable solution for improving swallowing safety and enhancing nutrition intake for individuals with dysphagia․ By following proper mixing instructions and consistency guidelines, users can achieve optimal results․ Always prioritize medical advice, especially for infants and children․ The convenience of ready-to-drink options and ease of integration into meals make Thick-It a practical choice․ Regularly check expiration dates and store products correctly to maintain quality․ With consistent use and adherence to instructions, Thick-It can significantly improve swallowing safety and overall well-being for those in need․

anti ship missiles range for usa warships pdf

Anti-ship missiles have revolutionized naval warfare‚ offering precise and long-range capabilities to target surface vessels. Their development has shifted naval strategies globally‚ emphasizing stealth and advanced guidance systems to counter traditional maritime superiority. These weapons pose significant threats to modern fleets‚ necessitating robust defense mechanisms and adaptive tactics to ensure survival in contested waters.

Overview of Anti-Ship Missile Systems

Anti-ship missile systems are advanced weapons designed to target and neutralize enemy surface vessels. These systems integrate launch platforms‚ guidance technologies‚ and propulsion mechanisms to deliver high-precision strikes. Modern variants‚ such as the LRASM and Harpoon‚ feature extended ranges‚ enabling attacks from beyond enemy detection capabilities. Their primary purpose is to counter naval superiority by targeting warships‚ supply vessels‚ and amphibious forces. The development of stealth capabilities and advanced propulsion systems has enhanced their lethality. These missiles play a pivotal role in contemporary naval warfare‚ offering strategic advantages in littoral and open-ocean combat scenarios. Their deployment has reshaped naval tactics‚ emphasizing defense and countermeasure development to mitigate threats.

Evolution of Anti-Ship Missile Technology

Anti-ship missile technology has undergone significant advancements‚ evolving from rudimentary systems to highly sophisticated weapons. Early missiles relied on basic guidance systems‚ but modern variants incorporate advanced propulsion‚ stealth‚ and precision-guided capabilities. The development of missiles like the Harpoon and LRASM marked a shift toward longer ranges and improved accuracy. Recent innovations include hypersonic missiles‚ which operate at speeds beyond Mach 5‚ and AI-integrated systems for enhanced targeting. These advancements have transformed anti-ship missiles into strategic game-changers‚ enabling nations to challenge naval dominance effectively. The continuous evolution of this technology underscores its critical role in shaping modern naval warfare dynamics and strategic balances.

Types of Anti-Ship Missiles Deployed Against US Warships

Advanced anti-ship missiles‚ including Harpoon‚ LRASM‚ NSM‚ and Tomahawk‚ pose significant threats to US warships due to their long-range‚ stealth‚ and precision capabilities in naval warfare.

Harpoon Missile: Range and Capabilities

The Harpoon missile‚ a key anti-ship weapon‚ boasts a range of approximately 220-330 kilometers‚ enabling strikes against maritime and coastal targets. Its precision-guided system ensures high accuracy‚ making it effective against large warships and fortified installations. Deployable from ships‚ submarines‚ and aircraft‚ the Harpoon’s versatility enhances naval operations. The missile’s turbojet engine allows subsonic speeds‚ while its penetrating warhead delivers significant damage; Its operational range and multi-platform compatibility make it a critical asset for the U.S. Navy‚ ensuring strategic superiority in contested maritime environments.

Long Range Anti-Ship Missile (LRASM): Specifications and Operational Range

The Long Range Anti-Ship Missile (LRASM) is a precision-guided‚ subsonic missile designed for long-range engagements. With an operational range exceeding 200 miles‚ LRASM leverages advanced seeker technology to detect and engage targets in contested environments. Its design incorporates elements from the Joint Air-to-Surface Standoff Missile (JASSM) Extended Range (JASSM-ER)‚ enhancing accuracy and survivability. LRASM can be launched from surface ships and aircraft‚ providing flexibility in operational deployment. Its ability to operate in GPS-denied environments and resist countermeasures makes it a critical asset for countering enemy fleet movements. The missile’s development addresses the urgent need for enhanced anti-ship capabilities‚ ensuring U.S. naval superiority in maritime conflicts.

Naval Strike Missile (NSM): Stealth Design and Combat Range

The Naval Strike Missile (NSM) is a fifth-generation‚ stealth-capable anti-ship missile designed for superior combat performance. Its sleek‚ low-observable design minimizes radar cross-section‚ enhancing survivability against advanced air defenses. The NSM boasts an operational range of over 185 kilometers‚ enabling it to strike targets beyond the horizon. It employs inertial navigation combined with GPS and terminal imaging for precise targeting. The missile can be launched from both surface ships and submarines‚ offering flexibility in deployment. Its 125kg warhead provides significant lethality against large naval vessels. The NSM’s stealth characteristics and long-range capabilities make it a formidable asset in modern naval warfare‚ particularly for countering enemy ships in littoral and open-ocean environments.

Tomahawk Land Attack Missile (TLAM): Dual Role in Anti-Ship Warfare

The Tomahawk Land Attack Missile (TLAM) is a versatile‚ long-range cruise missile primarily designed for land attack missions but also capable of engaging ships. Its dual-role functionality enhances fleet adaptability in combat scenarios. With a range exceeding 1‚600 kilometers‚ the TLAM allows U.S. warships to strike targets far beyond the horizon. Equipped with advanced navigation and terminal guidance systems‚ it ensures high precision against both land and maritime targets. The missile’s ability to be launched from submarines and surface ships adds to its operational flexibility. While its primary role remains land attack‚ its anti-ship capability underscores its importance in modern naval warfare‚ making it a critical asset for the U.S. Navy in contested maritime environments.

Defense Mechanisms Against Anti-Ship Missiles on US Warships

U.S. warships employ advanced defense systems‚ including the Aegis Combat System‚ CIWS‚ and electronic warfare‚ to detect‚ disrupt‚ and neutralize incoming anti-ship missiles‚ ensuring enhanced survivability in hostile environments.

Aegis Combat System: Detecting and Neutralizing Incoming Threats

The Aegis Combat System is a cornerstone of U.S. naval defense‚ integrating radar‚ missiles‚ and command systems to detect and neutralize anti-ship missiles. Its advanced SPY-1 radar provides unparalleled detection ranges‚ tracking multiple threats simultaneously. Aegis employs Standard Missile interceptors to destroy incoming missiles‚ ensuring robust protection. Additionally‚ the system’s scalability allows integration with other defense networks‚ enhancing situational awareness. Constant updates and modernization have kept Aegis at the forefront of missile defense‚ countering evolving threats effectively and safeguarding U.S. warships in high-risk operational environments. This system’s reliability and precision are vital in maintaining naval superiority against modern anti-ship missile threats.

Close-In Weapon System (CIWS): Last Line of Defense Against Missiles

The Close-In Weapon System (CIWS) serves as the final layer of defense for U.S. warships‚ engaging anti-ship missiles at extremely close ranges. Known as “sea whiz‚” CIWS uses radar and computer-controlled guns to detect‚ track‚ and destroy incoming threats automatically. It is effective against missiles‚ rockets‚ and small boats‚ firing bursts of high-speed rounds to neutralize targets. Systems like the Phalanx CIWS employ a Gatling gun capable of firing thousands of rounds per minute. While highly effective‚ CIWS has limitations‚ including short engagement ranges and vulnerability to saturation attacks. Nonetheless‚ it remains a critical asset for protecting ships when other defense systems fail to intercept threats. Its rapid response ensures survival in high-intensity combat scenarios.

Electronic Warfare and Chaff Systems: Disrupting Missile Guidance

Electronic warfare and chaff systems play a pivotal role in countering anti-ship missiles by disrupting their guidance systems. These systems detect incoming threats and deploy chaff‚ creating false radar signals to confuse missile seekers. Advanced sensors and radar systems identify hostile projectiles‚ enabling rapid deployment of countermeasures. Chaff clouds saturate enemy radar‚ overwhelming missile guidance and forcing projectiles to target decoys instead of the ship. This technology‚ combined with electronic jamming‚ disrupts communication links between missiles and their launch platforms. Such systems are critical in saturating attacks‚ where multiple missiles overwhelm traditional defenses. They enhance survivability by buying time for other defenses like CIWS to engage threats. Chaff systems are integral to modern naval defense‚ ensuring U.S. warships remain resilient against evolving missile threats.

Modern Challenges and Vulnerabilities

Modern naval warfare faces challenges from saturation attacks and hypersonic missiles‚ which challenge traditional defense systems and demand advanced countermeasures and adaptive strategies.

Saturation Attacks: Overwhelming Ship Defense Systems

Saturation attacks involve firing multiple missiles simultaneously to overwhelm a ship’s defense mechanisms‚ increasing the likelihood of breaches. Modern anti-ship missiles‚ such as the LRASM and NSM‚ can exploit this tactic by saturating systems like Aegis and CIWS‚ which may struggle to intercept all incoming threats. This approach forces ships to allocate limited defensive resources‚ potentially leading to vulnerabilities. The success of saturation attacks hinges on the sheer volume of missiles‚ making them a critical concern for naval forces. As missile technology advances‚ the effectiveness of saturation tactics continues to grow‚ challenging traditional defense strategies and demanding innovative solutions.

Emerging Threats: Hypersonic and Ballistic Anti-Ship Missiles

Hypersonic and ballistic anti-ship missiles represent a new era of threats‚ combining unprecedented speed and range to target naval vessels. These missiles‚ such as China’s DF-21D and Russia’s Zircon‚ can travel at speeds exceeding Mach 5‚ reducing reaction times for ship defenses. Their high velocity and maneuverability make them difficult to intercept‚ posing significant challenges to existing defense systems like Aegis and CIWS. Additionally‚ their long operational ranges enable adversaries to strike from beyond traditional defensive perimeters. The proliferation of these technologies forces naval forces to adapt by developing advanced countermeasures‚ including directed energy weapons and enhanced early warning systems‚ to mitigate the growing threat.

The Role of Stealth Technology in Evading Detection

Stealth technology has become a critical component in modern anti-ship missiles‚ enabling them to evade detection by radar and other sensors. Missiles like the Naval Strike Missile (NSM) employ stealth designs‚ including radar-absorbing materials and shaped exhaust systems‚ to minimize their radar cross-section. This capability allows them to penetrate defensive systems undetected‚ increasing their lethality. Stealth technology complicates traditional detection and tracking methods‚ forcing navies to develop more advanced sensors and countermeasures. The integration of stealth in anti-ship missiles underscores a shift toward asymmetric warfare‚ where smaller‚ agile systems can challenge larger‚ more conventional naval forces. This trend demands continuous innovation in both missile design and defense strategies to maintain operational advantage at sea.

Future Developments in Anti-Ship Missile Technology

Future advancements include integrating AI for enhanced accuracy‚ developing hypersonic capabilities‚ and employing directed energy weapons to counter evolving threats‚ ensuring superior naval capabilities in contested environments.

Advancements in Precision-Guided Munitions

Modern anti-ship missiles employ advanced precision-guided technologies‚ enhancing their ability to strike targets with pinpoint accuracy. These systems utilize GPS‚ inertial navigation‚ and terminal-phase radar or infrared seekers. Such advancements enable missiles to adjust trajectories mid-flight‚ countering evasive maneuvers by enemy vessels. Additionally‚ data-link connectivity allows for real-time updates‚ improving effectiveness against moving targets. These enhancements ensure that even at extended ranges‚ missiles can deliver devastating payloads‚ making them critical assets in contemporary naval conflicts. The integration of precision-guided munitions has significantly elevated the lethality and reliability of anti-ship missile systems‚ reshaping the dynamics of maritime warfare.

Integration of AI in Missile Systems for Enhanced Accuracy

The integration of artificial intelligence (AI) into anti-ship missile systems has significantly enhanced their accuracy and operational effectiveness. AI algorithms process vast amounts of data from sensors‚ radar‚ and satellite feeds to predict target movements and optimize missile trajectories. This enabling technology allows missiles to adapt in real-time‚ improving their ability to evade countermeasures and strike with greater precision. AI-driven systems also enable missiles to prioritize targets and adjust flight paths dynamically‚ ensuring maximum impact. Furthermore‚ AI enhances situational awareness‚ reducing the risk of collateral damage. These advancements ensure that modern anti-ship missiles are more lethal and reliable‚ giving them a critical edge in naval warfare scenarios.

Directed Energy Weapons: The Next Generation of Ship Defense

Directed Energy Weapons (DEWs) represent a groundbreaking advancement in ship defense‚ offering unparalleled precision and speed. These systems‚ including high-powered lasers and microwave weapons‚ can neutralize incoming threats with minimal collateral damage. Unlike traditional missile systems‚ DEWs provide an unlimited magazine‚ engaging multiple targets without depletion. Their ability to counter anti-ship missiles at the speed of light makes them a game-changer for fleet protection. However‚ challenges such as high energy requirements and atmospheric interference persist. The U.S. Navy is actively integrating DEWs into its defense architecture‚ complementing existing systems like Aegis and CIWS. This leap forward in technology promises to revolutionize naval warfare‚ ensuring superior readiness against evolving threats. DEWs are pivotal in maintaining maritime dominance in the 21st century.

Anti-ship missiles significantly alter naval warfare dynamics‚ challenging traditional maritime dominance. Their proliferation demands advanced defense systems and adaptive strategies to safeguard global maritime security and power projection capabilities.

Impact on Global Naval Power Projection

The proliferation of anti-ship missiles has significantly altered the dynamics of global naval power projection. These weapons challenge traditional maritime supremacy by enabling smaller nations and non-state actors to threaten large warships. The U.S. Navy‚ in particular‚ faces increasing risks as adversaries like China‚ Russia‚ and Iran develop advanced anti-ship missiles with extended ranges. This shift compels naval forces to adopt defensive measures and redefine operational strategies. The vulnerability of capital ships to precision-guided munitions underscores the need for advanced defense systems and agile tactics. As a result‚ the geopolitical balance of power is reshaped‚ with naval dominance no longer guaranteed‚ prompting a global race to enhance both offensive and defensive capabilities.

Adaptive Strategies for Countering Future Threats

Navigating the evolving landscape of anti-ship missile threats requires innovative and adaptive strategies. The U.S. Navy is investing in advanced technologies such as directed energy weapons and AI-integrated systems to enhance defense mechanisms. These systems aim to detect and neutralize incoming threats more effectively. Additionally‚ the development of hypersonic missile defense capabilities is critical to countering emerging threats. Collaboration with allies and the integration of multi-domain operations are also essential to ensure a unified response. By leveraging technological advancements and fostering strategic partnerships‚ naval forces can maintain their operational edge and protect against future threats‚ ensuring continued maritime superiority in an increasingly contested environment. Proactive adaptation is key to safeguarding naval power projection.